

Which I was seriously SO excited about getting. I really really want to learn how to sew, so now I can! First though, this cabinet needed a makeover. Not that she wasn't beautiful in her own right, she just wasn't...my style. She had lots of potential though!

Here's how I made her over:
I took off all of the hardware and gave her a good sanding with my 100 grit sandpaper. I just wanted to get rid of the gloss / shine so the new paint would stick. I actually wound up removing the doors too.

I painted Kilz white primer all over her. Immediately, I regretted doing the inside. This just wound up being a lot more work for mainly me to see. It's definitely not a necessary step...she would've looked fine with her wood look on the inside. Oh well...she's now beautiful on the outside AND the inside!

This is going in the daybed room, so I took one of the pillows down to Home Depot to try to match up the blue / turquoise color in it. I wound up with BEHR's Aquatic Blue as my match. I got the paint and primer in one although I had already primed. Hey, an extra coat of anything helps...and I need all of the easy freebie help I can get!

I applied a really thin first coat with a foam brush (results shown above), and then applied a second coat with my Purdy brand paint brush (the best!). And then I did the big test of holding the pillow up to my new paint job...

It matched!! Whew! I was super nervous about going that bright with a piece of furniture, but I wanted it to be fun!
Next, I gave her some good 'ol Kara lovin' with the 60 grit sandpaper.

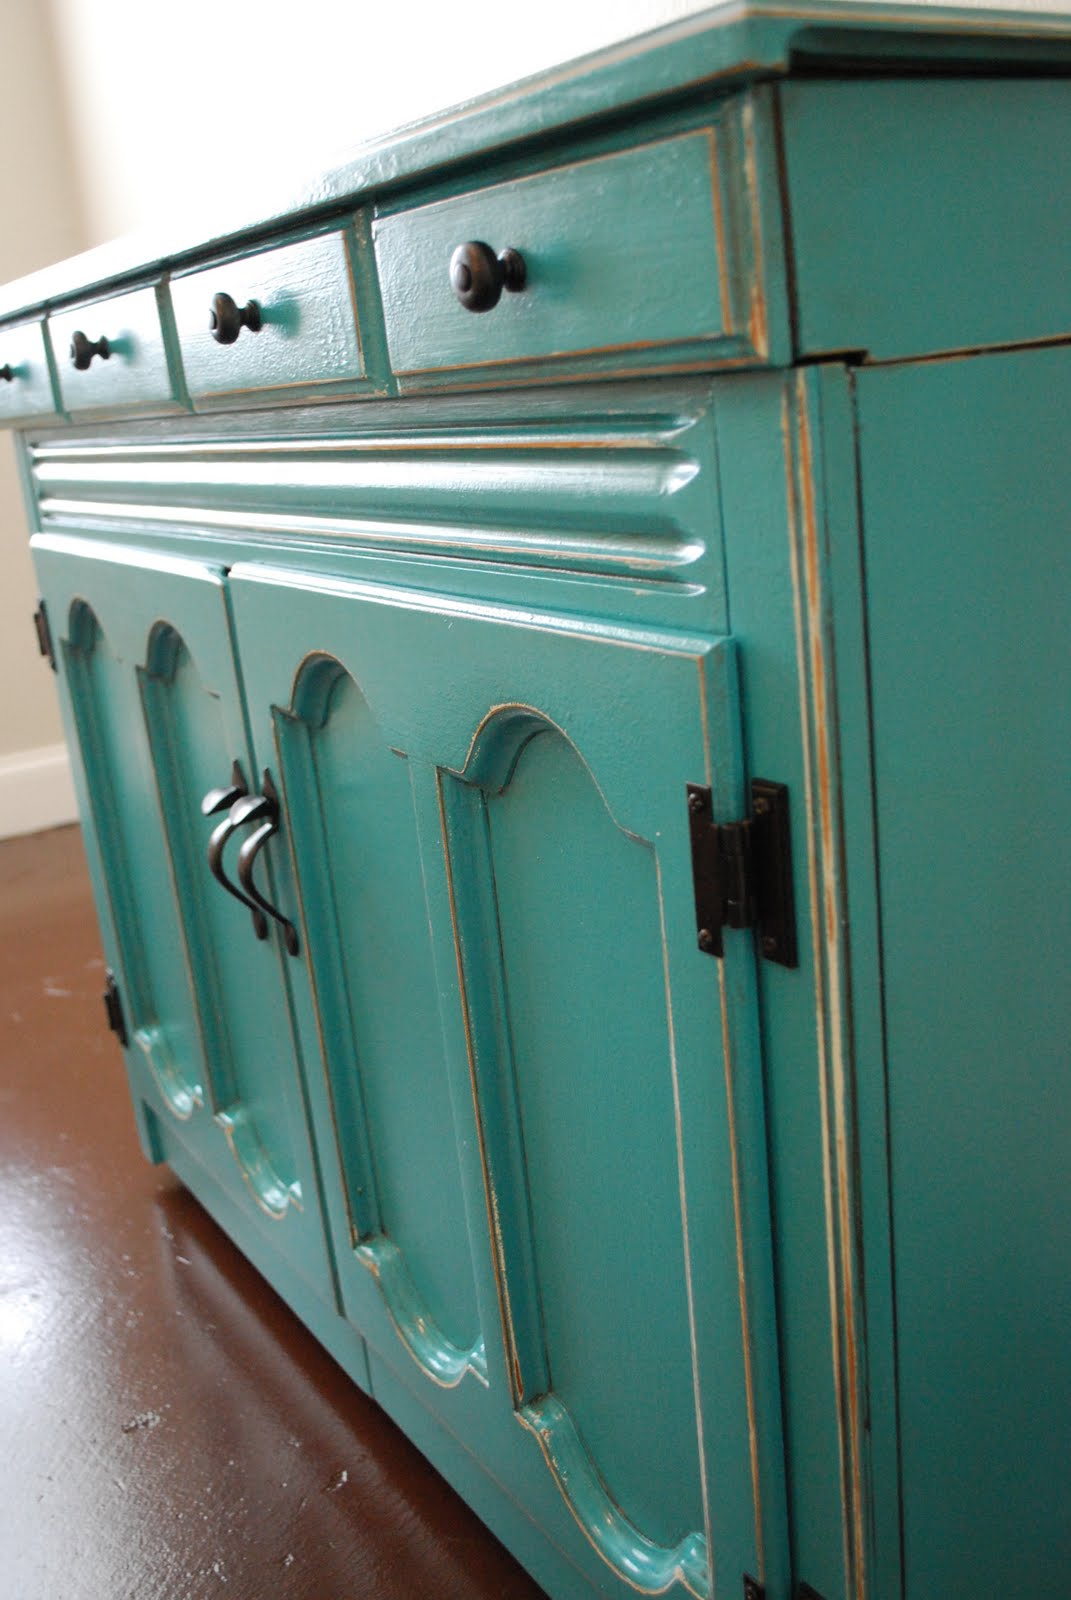
Are you starting to see her potential yet?! Just a little more lovin to go! I applied Ralph Lauren Glaze in Smoke on the entire piece, concentrating on the edges and nooks and crannies.

That part actually made me really nervous. You're essentially dirtying up your freshly painted furniture piece, but I do love the end result! Wipe on, wipe off. I hear the Karate Kid in my head...
The next step was to do something about that gold / brass hardware. I actually tried to buy new hardware, but nothing looked right, so I wound up sticking with the original and just giving it a makeover.
I cleaned all of the old hardware with warm soapy water, sanded it, and then spray painted it with Rust-oleum's Metallic rubbed bronze spray paint.

Hint: To spray paint the top of screw heads, put them in some Styrofoam, like this:

I put a few coats of the Min-wax water-based Polycrylic Protective Finish in Clear Semi Gloss. I normally use the oil based Minwax Polyurethane in the clear finish, but it does leave a little bit of a yellow tint on latex painted furniture. Stained wood, it's good, but for paint, the water based actually works better in my opinion. I actually figured this out by checking out Young House Love's website and their how-to on painting furniture when my top sealer didn't come out the way I wanted it to. No worries though if this is the case, it's easy enough to just take 220 grit sandpaper and sand off the top layer and re-apply!
After that, I screwed on the old hardware and wala!


I cheated on the inside and only painted the one thin coat with the foam brush. Once I get her belongings put back inside, you'll never be able to tell! She looks more...rustic and well loved this way.

And here she is in her new home.


Ignore the unmade bed, and otherwise empty room. It's a work in progress, from my daybed to my painted floors, and now this...I'm getting there!
Now...how much MORE fun does learning how to sew look like in my new creation?! I can't wait...Erin, I'm ready for my lessons!

Great job! I love the color you picked!!
ReplyDeletekara, learning to sew should be as easy as pie for you!! you are very talented...by the way...where is the sewing machine!! LOL!
ReplyDeletei love the color and finished look of the cabinet. it is a really beautiful job.
all the best,
donna
You did a fabulous makeover...♥♥♥ the end result!
ReplyDeleteLOVE how this came out! Love it! And not just because my master bedroom has these colors. The pillow fabric is gorgeous too, but your sewing cabinet project is a win! What a good job.
ReplyDeleteYou did a fabulous job!!! This is a happy color so go learn to sew and enjoy it!!!
ReplyDeletethat looks gorgeous! i love the lines of the piece and the color is fantastic!
ReplyDeleteoh I LOVE the blue color!!! It is my new favorite!! You did a really good job!!! Even on the inside. Looks fabulous!!
ReplyDeleteKara I love your sewing machine cabinet! That color is beautiful! I just redid a sewing machine table too. Yours turned out beautiful!
ReplyDeleteI love this cabinet and I love the blue you picked - so cute!!
ReplyDeleteYour cabinet is so beautiful! Great job. Have fun learning to sew!
ReplyDeleteThanks so much everyone!! I SO appreciate the compliments!!
ReplyDeleteDonna: I'll get the sewing machine back in there sooner or later!! :-) I was more interested in getting it revamped!
Wow - that's a great re-do. And, an awesome cabinet for sewing. I definitely encourage your sewing adventures - I started quilting about 3 years ago, and I'm loving it! Check out my blof for some inspiration.
ReplyDeleteBeautiful,, I'm very envious of your sewing cabinet.
ReplyDeleteHa! My sewing machine is in the exact same cupboard :) I love what you've done with it and now I totally want to do the same to mine.
ReplyDeleteWhat a great makeover! You got a great find with a cabinet that has so much storage. Have fun learning to sew! I love to sew and have been sewing since I was 9 years old. I was fortunate to take sewing classes while in 4-H. I did a make over on a sewing cabinet from a grandmother. You'll have to come and visit my blog to see it. Have a great day!
ReplyDeleteexcellent tutorial. our readers would love this. please do get yourself a link back to your site, and let them know about your project tutorial here:
ReplyDeletehttp://www.finecraftguild.com/diy-tutorial-linky-party-5/
as well: that blue is splendid!
Gorgeous! And I love the daybed. Have fun sewing!
ReplyDeleteKara I love what you did to the sewing machine cabnet! Love the color with the distressing. It brings the piece to the 21st centry.
ReplyDeleteLooks great! I love the fun blue to inspire you while you sew. Kinda makes me wanna paint my boring wood sewing desk too!
ReplyDeletegreat job on the makeover. the Minwax Polyurethane did leave a yellowish stain on my furniture. i'll try the water-based Polycrylic Protective Finish. hopefully it won't stain my white pieces this time.
ReplyDeleteShe is just beautiful! You did a great job! I'm a new follower from The Shabby Chic Cottage Link up.
ReplyDeleteOk, scratch that. I tried to follow you, but there's an error on your page and I'm not able to follow you. :(
ReplyDeleteI like your energy Kara! I do a lot of sewing myself..I like how the cabinet came out. Thanks for showing all the steps with the glazing. I'm your newest follower!
ReplyDeleteYou had me at turquiose. I am getting ready to do this to a TV armoire. I have been dragging my feet because it is going to be a project and a half!
ReplyDeleteWow, Kara! She's beautiful and looks great in your daybed room! I have been looking for something small to refinish. I settled on buying a $15 chandelier from the Habitat for Humanity Restore last weekend. I've got it primed and paint bought, but lack time without the children to work on it. I am constantly amazed at your can-do attitude and lovely creations!
ReplyDeleteLove this piece. It looks so high end! And the hardware came out great. My sewing machine is so jealous. It just sits on a shelf. LOL
ReplyDeleteOmigosh you are one talented girl! I love LOVE this color! I recently saw a desk at Home Sense in this exact color and LOOOOVVVEEEDDD it! I love your blog...I'll be following you! ~Billie Monster
ReplyDeleteGreat post! I love when someone takes the time to give the details and info on how they finished a piece of furniture! And of course, I love the color! It is beautiful!
ReplyDeleteWow! What a spectacular shade of blue! I absolutely love it!
ReplyDeleteVERY nice! I love your color choices too!
ReplyDeleteShelley
Love the pop of color and your pillow inspiration. It turned out beautiful!
ReplyDeleteLooks great! I love the color!
ReplyDeleteKara, I love the cabinet! Great job! I found you on Miss Mustard Seeds linkup.
ReplyDeleteSuch a pretty piece & i love the color on it! Great job!
ReplyDeletethe color is spectacular! a lot of work, but a great pay-off! cheers!
ReplyDelete:)Heidi
No way! Not only is it a great result, but I have the same pillow on my bed! :) http://lisasroombyroom.blogspot.com/2010/11/pillow-talk-ii.html
ReplyDeleteGreat minds.... lol!
I love the color! Fabulous! :)
ReplyDeleteWhat a great idea! Love what you've done with this piece! Best wishes on expanding your sewing skills:)
ReplyDeleteI love that cabinet. My sister in law has the exact same one. I would like one now that I'm getting into the crafter side of life :) We tried finding a brand name....but no luck. Do you happen to know the make and or model? I have been searching for one the last month or so and havent' had any luck :( Love your blog and good luck in all you do :D
ReplyDeleteLove the color. You did a great job repainting it. A lot of work but definitely worth it.
ReplyDeleteBlessings!
LaVonne @ Long Wait For Isabella
Love your blog! I found you from Ana White's website when I saw your entry way. Now I'm doing a coffee table with this exact finish!! Thanks for the ideas!
ReplyDeleteLOVE! how long did you leave the glaze on before you wiped it off?
ReplyDeleteThanks!! I did the glaze section by section and wiped off the flat part as soon as I got it completely covered. Pretty much immediately. I pushed the glaze into the crevices and then sealed them with the polyurethane. I would say wait no longer than a minute or two if you don't want a deep glazed look on the flat surfaces. If too much sticks, just wet your cloth and it'll help the excess stubborn glaze come off. Good luck!
ReplyDeletethis is gorgeous! I LOVE IT!!
ReplyDeleteI have the exact same cabinet.... do you know the the make and year of the cabinet?
ReplyDeleteI have the same cabinet but don't know make , year , or model. Do you know, hopefully
ReplyDeleteGood afternoon Kara;
ReplyDeleteGood job on refinishing the cabinet. Out of curiosity, is it a Singer cabinet? I recall buying one 30 years ago at a Singer dealership and in its original finish, your cabinet looks similar. They are a solid cabinet with potential. Good luck in your sewing ventures. Cheers, John
Thanks for this post.
ReplyDeletecoupon codes