Showing posts with label baby gifts. Show all posts

Monday, August 27, 2012

Diaper Wreath and Wishing Tree

Well, since we're in party mode, I thought I'd keep it rolling by posting on some of the baby showers I threw / helped throw while I was on my hiatus from blogging.

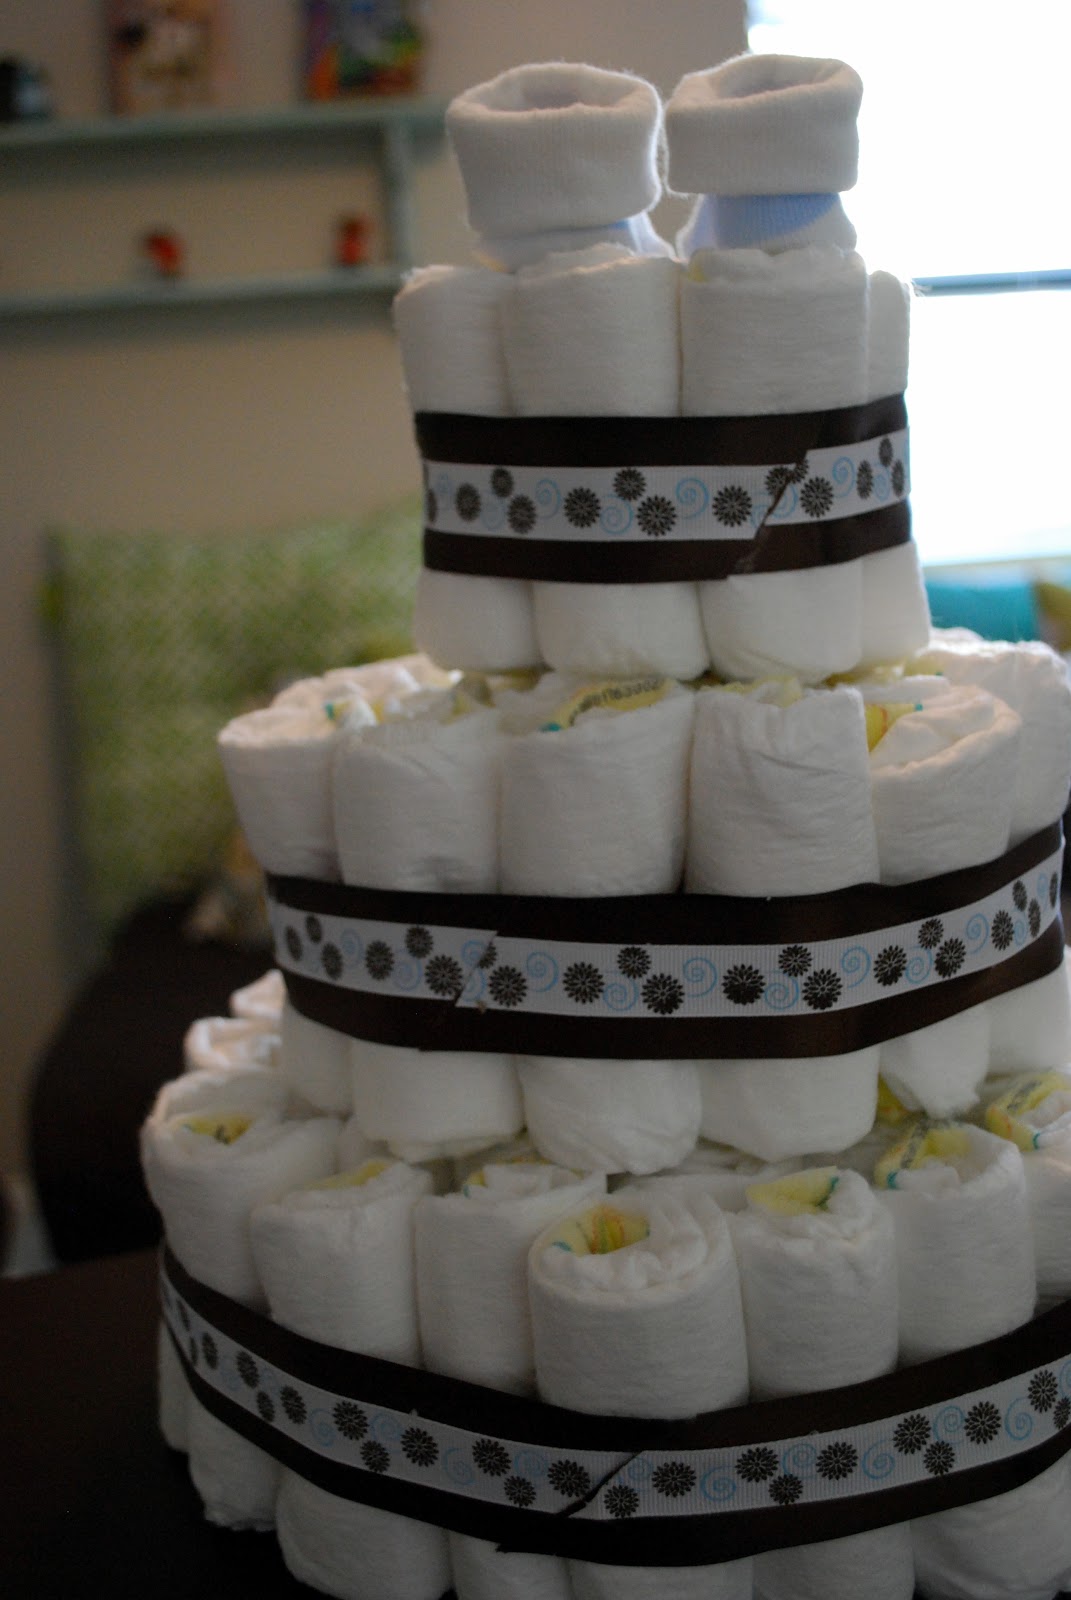
I've made a diaper cake before, and I've received a diaper cake before.  Let me tell ya, after unrolling a million itty bitty tiny diapers and trying desperately to make them flat so they'd lay in my diaper basket I had for Kalia, I really would be a happy camper if I never had to make one or unroll one ever again.  Those things are a pain!  They are super cute, but not so practical.  I mean, I guess they're practical, it just takes a.lot of work to get to your present!

But I know they're cute, and if nothing else, baby showers are supposed to be cute.  Sooo...I decided to make a diaper wreath instead!

Here's the materials you need :


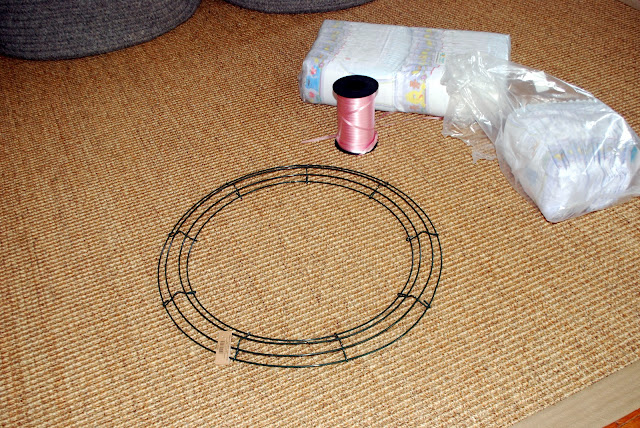
All you do is take those little diapers, and tie a string around them until you fill up the wreath form.


This one was going on the front door of one of my girlfriends parents house on a tiny nail, so I didn't want it to be too heavy, so it just got filled with diapers.


This next one I hung in the mirror above my buffet in my laundry room and added in a few toys for the new baby boy.  I know when Kalia reached the age where she started wanting toys, I was so grateful that friends had gifted me with them, even though they weren't something I thought to register for.


And this last one was for a second time Momma.  She's got lots of toys, so I stuck with bath supplies to fill her diaper wreath with.  Her first one was also a large baby, so I skipped the newborn diapers and went with larger ones.  Much more practical when your baby outgrows newborns dipes before even leaving the hospital!


Another thing I did for all of these showers that was a big hit was a wishing tree.  For my girlfriend that was having a little girl, I took a branch, spray painted it white, then added in a tiny bit of silver spray paint to make it more girly and added in white rocks.


For all three baby showers, I used this cute little bird notepad and had people write their wishes for baby and Momma to be.  It's a cute way to do a personalized guest book.  I added these little buckets to hold the pens and paper in.


For the Momma's that were having boys, I stuck to bare branches and the yellow and brown rocks.


I also used baby bottles for vases, which I thought was a really cute touch.


Unfortunately, with a wee one in tow for all of these showers, I didn't snag as many pictures as I would've liked to.  Chris snagged this one of Kalia and I at the first shower...it is crazy how much she's changed (she was 5 months in this pic).  She looks so little here!!


Ahhh...love those dimples of hers so much!!!  Sorry, sorry, back to the post...

All of these babies the showers were thrown for have already been born, and I'm so glad I could help their Momma's get ready to celebrate their big days by throwing these showers for them.  I am, however, officially on a baby shower hiatus...for now anyways.  I'm actually onto wedding stuff (yay Jenny!).

Anyone else throwing a massive amount of baby showers, or got any fun ideas for bridal showers / bachelorette parties (that's not x rated!)?  I swear, something gets in the water around these parts...it seems like we go through spurts where everyone is pregnant!

Hope you guys had a great weekend!  Happy Monday!

If you enjoyed this post, please leave a comment or subscribe to the feed reader to get future posts delivered to your reader.

Linking up to the parties in my sidebar - go check them out!

Monday, May 30, 2011

Nursery Room - Monogram

This is the last nursery project I plan on doing before Kalia gets here.  I actually didn't really plan on having to get it done before she arrived, but since she's showing up fashionably late, the last and final project is complete.  Sort of.  I'm still working on sewing her quilt, but right now my sewing machine and I aren't on speaking terms, so that one most definitely will wait until after she gets here.  Hopefully before her first birthday!  (Kidding...sort of).

For above Kalia's crib, I wanted some of our maternity pictures displayed.  I initially planned on just doing some sort of canvas or frames, but after doing the gallery wall above the dresser, I decided I needed something a little bit different for above the crib.  I walked in and out of there about 1000 times, and finally came up with something that I thought I'd like...decoupaging our maternity pictures to a big huge K.

We have at of scrap wood left over from various build projects, so this project was pretty close to free.  Actually, it cost $5 for the spray paint and pictures.

First up, I drew out my K on a leftover sheet of 3/4'' plywood.  I couldn't decide if I wanted 5 x 7's or 4 x 6's, but after laying out both sizes, the 5 x 7  K was just too big.  I do kind of wish I would've made this so the arms of the K were the same size as the body, but I still like the final outcome.


Chris came into the garage at some point during this, and agreed to make my cuts for me with the jig saw.  I don't fit behind tools anymore, so I either have to bend over waaaay low to get things below my belly, or just pass the task of to Chris.


After Chris made the cuts while I held the board in place, we were left with a huge giant K.


I spray painted that black (while wearing my awesome mask), and then got up in the middle of the night to decoupage our maternity pictures to it.  Sleep is getting harder and harder these days, so I moreso just nap a lot.  My weekends consist of : nap, project, errands, eat, repeat.  Anywho, I don't have pictures of the giant K just spray painted, but just imagine the image above black.

After the decoupage, here's what my K looked like :


I decided the ends needed a little bit ... more ... to it, so I cut out circles of fabric and added fabric type flowers.  It added a feminine touch without being too girlie.  These two fabrics are leftovers from her quilt too, so once I start speaking to my sewing machine again, this will tie in perfectly.


The centers are just pins that I snapped off and then bent into place.  I glued them down using quick grip, and then attached the flower with quick grip to my K, but only where the pins were.   That way I could still ruffle the 'petals' of my flower to have more of a 3D look.


Chris came in and thought the middle of the K needed flowers too, so I made a few smaller blue ones while I was at it.


We put the hangers in the back of it, and hung it above her crib.  Here's the final product :


What do you think?  Too big, too small, or just right?  I debated about painting the K another color besides black, because I do love color in a nursery...but ultimately decided the pictures would look better against a black background.  I also decided the black background went with her crib skirt and crib a little bit better, but I'm still on the fence about whether or not I'm going to add color back in.

Here's how it ties in with her crib :


When she gets big enough to pull things off the wall, we'll either have to put a screw through this, remove it, or pull the crib away from the wall so she doesn't pull it down on herself.  For now, I'm just ready for her to be here already!  Oh, and ignore the wrinkly sheet and bedskirt.  The last thing I feel like doing is ironing these days!

And my favorite part...here's where we started with this wall :


And after a ton of work, here's what it looks like now :

Installed bamboo floors, painted walls and closet, new crib, custom built in closet system, custom built dresser
(To see my documented projects and paint colors I've used on this section, click on any of the links below the picture.)

So that's it...my last and final nursery project.  Maybe Kalia was waiting for me to finish that up before deciding to show up.  I'm done, she can come now!!  I'll do a full nursery tour and recap everything sometime soon.  Unless Kalia shows up...then I'll go MIA for a little while before sharing her with you guys, and then do a full nursery room tour!  :-)

Believe it or not, we had a busy busy Friday and Saturday.  I've got another room that we gave a mini face-lift to show you guys later on in the week, so stay tuned!

Hope everyone's enjoying their Memorial Day today!  Happy Monday!

If you enjoyed this post, please leave a comment or subscribe to the feed reader to get future posts delivered to your reader.


I'm linking up to the parties in my sidebar...go check out what everyone else is creating!

Thursday, December 9, 2010

Baby Shower

Thanks so much to everyone for their kind and sweet words on my latest post.  The emails and comments I got were beyond touching, and I really truly appreciate every single one of them.  I'm doing better...I'm gonna focus on what I tell other people to do...look for the rainbow after the rain.

Also, thanks for all your compliments on our family pictures!  Some of you guys seriously made me blush!!

Now...onto more fun topics...like posting pictures of the baby shower!!!

The shower started at 530 p.m., so the other girls started showing up around 5 to put their food and decor out before the Mom and Dad to be showed up. Here's some photos I snapped really quickly before the chaos began...

First up, the changing table with the diaper baby and the m&m favors.  Only one diaper baby made it on display.  The other one I couldn't figure out a way to creatively incorporate.  Besides, we wound up needing the diapers for one of the games!


As far as the books on the changing table, we had asked everyone to bring a book in lieu of a card, so we could get the babies library started.  I think the Mommy and Daddy to be really appreciated this!

The Hersey's Bar Favors.


The Diaper Cake with a few more of the Favors for decoration.


The two Baby Garlands on either window.  Thanks so much to another Kara for suggesting using the 3M removable hooks.  They worked so perfectly, and I think my T. Mom has now taken stock in them for hanging her Christmas decor!


Here's a view of the room from the kitchen :


Oh yes, and Kodi.  That's Kodi's second home, so he protects it and watches over it like he does his own.  And yes, that's the Auburn / Alabama game on TV.  I'd like to say that I had the football game on because it was a coed shower, but we all know how much I enjoy watching college football (even if it's not the Gator's - go SEC!).

My parents recently redid their kitchen (in all honesty, they recently redid their entire home...I'll have to do a before and after post at some point), and their bar area works out perfect for doing buffet style food and drink.  All of my co-hosts brought something, so this entire counter was filled to the max once everyone got there.


We used the large containers for water and sangria, the decanters for wine,  and then on the far left we made a non-alcoholic punch.  I put out little labels so people knew what things were, which worked out perfectly!

After dinner, we played a few games.  To get the guys involved, we did a diaper changing contest between the boys.  We had 2 rounds of three guys (one of the experienced Dad's was disqualified...when you have 2 still in diapers, it's just an unfair advantage!)

Round 1 :

Uncle to Be, Dad to Be, Grandpa to Be
Round 1 winner : Tie between the Daddy and Uncle to Be!!

Round Two
Ryan, Tim, and Chris
 I had to include that picture for round two.  Do you see my husband's face?  He's looking at those diaper tabs like 'what the heck do these things do?!'  And you wanna know what his diaper baby looked like?!


 No, the doll didn't come with a dirty diaper already.  Oiy...I have some work to do one day!!

Obviously, Chris didn't win round 2.  Tim did.

Round 3 : Playoffs.  From this picture, it's obvious that the soon to be Daddy won!!!  Yay!


He might need to give Chris pointers one day!

Here's the only picture I can find of the gift table, and the "best balloon in the entire world".  The baby's name is Yulander III, so it was a really cute balloon.  We had flowers dispersed throughout the table, which added such a fun touch!

Gift Table with Grandma to be!
And lastly, I'll end on a picture of the Uncle, Grandma, Mommy, and Daddy to be :


It was such a fun shower...a lot of work and love went into making it as special as we could, and the Mommy and Daddy to be really appreciated it all.

So what's the end verdict on the diaper baby?  Still creepy, or did you think it worked well on the changing table?  I really did have such a good laugh reading through all of your thoughts and opinions on that...you guys surely are entertaining!

Thanks again for all of the kind words on my last post.  Your support is so appreciated!!

If you enjoyed this post, please leave a comment or subscribe to the feed reader to get future posts delivered to your reader.

Wednesday, November 24, 2010

Refinishing a Melamine Changing Table

Yep, another baby post.  This one isn't a craft though, this one is a furniture makeover...more up my ally than the rest of the posts.

Our friends know that my hobby is to build things, so they asked if I'd make them a changing table.  With my complete lack of any free time with the holidays and Chris's school, and my funds running rather short with those two as well, I did the next best thing...I found one on Craigslist and re-did it for them.

Their requests were that the changing table had drawers, not shelves, and that it be coffee colored.  I scoured craigslist for FOREVER trying to find a wood changing table that I could refinish.  I finally found one that looked like it would fit the requirements, with one slight problem.  I found it on the craigslist where my parents live.  I called my T. Mom and asked if she wouldn't mind going to check it out, and if it was wood and looked good, to go ahead and get it for me.  I'm lucky I have nice and helpful parents, I know.

When they came over the weekend of November 12th, they brought it with them so I'd have time to work on refinishing it.  My initial plan was to try to get it ALL done Thanksgiving day, which was an absolutely dumb idea and there's no way it would've worked out.  Thank goodness they're smarter than I am and brought it on over.


Do you see the problem with this furniture makeover yet?  It's not really all wood like I'd build with.  It's the melamine / particle board finish that a lot of furniture is made with, but that isn't all that easy to refinish.  Oiy.

First, I attempted to sand, and then re-stain this.  I knew it wasn't going to work, but I still wanted to try.  I used 150 grit sandpaper just to lightly sand the surface and then stained a small section along the back.  You can actually see that in the first picture.  Unfortunately, my intuitions were right, and all of the stained rubbed off really easily.

Time for plan B.  Gel Stain.  I've used Gel Stain before on my front door.  My Dad actually suggested that we use it when I wanted to go for the stained look, but my door was fiberglass (or so I thought, under like 300 layers of paint, it really was wood, but that's another story in and of itself).

Gel Stain will stick to a lot of surfaces, melamine included.

There are a few downsides though.

  • It's really hard to get a completely even finish.  You can go super slow and think that you have a super even coat, and it still will dry a little uneven.  It's unfortunate, but it's a reality.  Check your "it's got to be perfect" hat at the door.
  • It takes FOREVER to dry.  The container says 6-8 hours before a recoat, and 24 hours dry time I think.  Mine took more like 48 hours.  If you touch it or attempt to do anything with this piece inside of that time, you will leave streaks on it.  I do live in Florida, so I do realize that humidity and temperature play a part here, but still be very cautious on this.
  • You need to work relatively quickly in sections.  You can go over your previous brush stroke, but you've got at max a 5 minute window before you just start smearing the gel.  This plays into the hard to get an even finish qualm as well.
  • Your color options are limited.  My Home Depot had a light wood, a cherry wood, and a brown wood color and that was it.
  • It is significantly more expensive than a can of regular stain.
So again, the huge benefit is that you can get the stained wood look that you want on a less than ideal surface, but it is a wee bit of a pain.

I don't have step by step pictures of this one...I did this whole thing over the course of a week and a half.  I finished up on Monday putting my 2nd coat of polyurethane on it.  Whew...just in time to let it dry before heading over for the holidays.

I got these cute knobs at Anthropology.  Obviously, the pink wasn't gonna work with the baby boy they're having!


Here's a close up of the knobs in action :


I actually didn't tighten the knobs all the way...we have to take it over for the shower, so we might need to remove them then, and I didn't want them to struggle with trying to get them off when they try to transport this beast home.  So, ignore the slightly crooked knobs please!

Here's the finished product :


I'll end on one last picture of my diaper cake standing where it'll go for the shower.  One of the diaper babies is going to go on the changing table here as well, but positioning those babies can be semi time consuming, so you'll have to wait until baby shower pictures to get the full effect.


I really hope the Mom and Dad to be like it!!

ONE more day till Thanksgiving!!!  Woo Hoo!!
If you enjoyed this post, please leave a comment or subscribe to the feed reader to get future posts delivered to your reader.


I'm linking up to the parties in my sidebar...go check them out!

Monday, November 22, 2010

Diaper Cake

This weekend was filled with quality time with good friends (more on that in a later post) and lots and LOTS of baby shower projects.

First up, I finished my diaper cake.  A few of you suggested the diaper cake when I posted my diaper babies, and it was already well in  the works!  I made the diaper babies out of left over diapers I had from making this cake.  I think I probably used about 75 newborn sized diapers.

There's tutorials all over the web on how to do this, but I'll show you what I did :

First, wrap a million diapers up in rubber bands :


Next, get either a bottle, or if you're in a crunch like me and don't feel like running to the store to get one, unwrap your paper towels from your holder, and use the cardboard tube that comes with it instead of a bottle.  Hey, it works.


Trim the cardboard roll so that it's just slightly higher than 2 stacks of the diapers, like so:


Take your rolled diapers and start putting them around your center.  I found it easiest to do the top piece first.  I put a big rubber band around the layer, then shoved in diapers.


For just the top layer, I removed it from the center piece and added another diaper in the center.  That way you don't have a big hole in the middle your cake topper.


For the bottom layer, I repeated this with 3 separate layers.  After I was finished with one layer, I'd put one diaper on the outside of that layer, and put a rubber band around it, and then shove the diapers in the rubber band.


The middle layer was 2 rows, and the top was 1.  Here's what it looked like with all of that :


I couldn't find wide ribbon that I liked the colors or design of, so I made my own.  I took a brown underlayer of 1 1/2 inch ribbon and used my trusty fabri-tac to secure a smaller ribbon in the middle of it.  I taped the ribbon to the outer layer of the rubber band to get the ribbon band started:


Then I wrapped the entire ribbon around the cake, pulled tight, and used fabri tac to secure the back side of the ribbon to itself, like so:


And the final product:


I'm actually really happy with how this came out...it looks so cute, and what it's sitting on (the changing table) is going to be it's 'home' for the shower, and I love them together.  Stay tuned for another post this week on the changing table (and MORE baby shower stuff...can you even handle it?!?!)

Hope everyone had a great weekend!  I got 3 more people checked off for Christmas gifts...wahoo!!!  Makin' progress...

OH, and...today is my wonderful husband's 29th birthday.  So those of you that know him, drop him an email, phone call, or a comment here to wish him a Happy last year of his 20's!!  I'm so thankful he was born 29 years ago, I don't know what I'd do without him!!

If you enjoyed this post, please leave a comment or subscribe to the feed reader to get future posts delivered to your reader.


I'm linking up to the parties in my sidebar...go check them out!
Related Posts with Thumbnails