Saturday, April 30, 2011

Go Big or Go Home!!!

That's one of Chris and I's favorite sayings to each other. We say it as we're laughing at some epic fail moment that we've got to figure out how to turn into a learning experience.

...so in tune with our epic fails, we're entering our epic fail of a game room / formal living room


into ...


Yep, the Epic Room Giveaway from Mandi at Vintage Revivals.

Mandi is so talented with her DIY skills, and I would love to have a 3rd (and 4th - her sis is coming along to the winners home too!) set of hands / eyes / ideas to help turn this ...


epic fail of a room into something completely amazing.

Now, in general, I am pretty proud of all of my DIYing skills. I'm pretty confident in my ability to take a room and transform it into something I love.

But I'm 9 months pregnant, and I'm tired...and this house is big. It's huge, mad, big, and my creativity is wearing thin. And I promised Chris that our bedroom would be what I focused on next, which means that I'll spend a buzillion months in there this year. And this room...this pathetic, sore eye of my entire house room, really REALLY needs attention.

We bought this furniture when we moved into our first house, right after graduating college. My college living room couch had been in my college house for 3 years. That thing was just gross, and we were in a hurry to get rid of it and get our first set of grown up furniture.


But palm trees everything?! UGH. I mean, how much more stereotypical Florida decor can you get? This is what you expect to see in some Grandma home...or in a Florida styled hotel. Not in a young couples living room.

Oh, and the worst part about this sore eye of a room? It's the VERY FIRST thing you see when you enter through our front doors.  So people think this is our style.  Perfect.  Great.

Hi, want to see what bad taste my Mom and Dad have?  It's really embarrassing...come on in!
Another huge fail of this room is the lack of any light.  See this light?


It's the only one that is sort of in the entire room.  And I have no idea what to do with this big giant area that's just sparse and blank prior to where our palm tree themed area rug starts.  It's just a lot of open space.  Any help would be SO appreciated!


Our vision / plan for this room is to make it a game room.  We want it to be a fun game room for not only us, but our future kids as well.  Granted, Kalia would only be a month or two old when Mandi came, but this is our forever house...and I want to make every room fun, functional, warm, and welcoming.

This?


This isn't any of those.

I would have absolutely no problem re-doing anything that currently exists in this room.  Mandi can transform broken dishes into an amazing lamp, so I have 100% confidence that if she says she can make these ugly things look modern, she can.  She really is amazing.

And I'm not exactly handicapped when it comes to building / transforming / painting / idea-ing / crafting.  Can you imagine if the two of us, with the accompaniment of her sister and my hubs, could do to this room?!  We could build stuff, we could re-purpose stuff, we could thrift shop...ohhh...the possibilities are endless!!

Oh wait...there's one thing that I bought for this room that I really love...


Yeah, I bought this dartboard for Chris for Christmas from Restoration Hardware on clearance...a year and a half ago.  Christmas 2009.  That's how long I've had intentions of redoing this room.  And I've epically failed.

So why should Mandi come to my house to help with this epic fail of a room?
Because ...

  • We live in the sunshine state of Florida.
  • We are both serious DIY'ers and would be up for building / refinishing / ANYTHING to make this room not look like some Grandma's room and a game room instead.
  • We'll have a newborn baby (a few months old) that will undoubtedly be adorable!!
  • We have an awesome pool deck area to chillax on after a long hard day of DIYing.
  • You would make this guy very very happy if you came!!!


Yes, having a newborn is going to be crazy and hectic, but oh my goodness, having someone's vision to implement in this room shortly after she gets here would just make me feel ... so me.  I'm so ready for a big room remodel, but I need vision and ideas!!  This pregnant brain is just eating all of my brain power, and I need Mandi to come here and help.

So Mandi, please please PLEASE bring your awesome self to our home.

No...I'm not above begging!!!  Peeps of my blog that love me, please go over and vote for my entry starting Sunday to help this soon-to-be new Momma out!!  Thanks!

If you enjoyed this post, please leave a comment or subscribe to the feed reader to get future posts delivered to your reader.

Friday, April 29, 2011

Nursery Room - Gallery Wall

I had this vision for a eclectic gallery wall for Kalia's nursery using different types of frames and just spray painting them all black to make sure they all tied in not only together, but with the alphabet wall art too.  Then my OCD / engineering / anal side kicked in, and I couldn't do anything other than something that was completely symmetrical.  I hate it when my Engineering side conflicts with my creative side, but I guess I'm thankful to have both sides to be honest.  It's an odd combination, for sure!

To test out my gallery wall idea, first I laid out the pictures with the mirror to see how they all worked out together.


This was after I had already painted the mirror, but before I had built the frames.

Really, once I got the frames built, I realized that only two of the 5 x 7 pictures were going to fit.  I'll probably replace these photos with my maternity pictures or pictures of Kalia when she gets here!  I love that everything is switchable!

Chris and I measured and hung the frames for the left side...


and the right side...


Then I found an adorable lamp that fit in perfectly to the same shade of pink and added that to the top of the dresser (on sale for $25 at Kirklands!).  Here's what Kalia's dresser wall looks like altogether :


Close-up :


I still have to get a changing pad for her to put on here.  We intentionally hung this wall higher than we'd actually really like to because we don't want little fingers grabbing these off of the wall.  When she gets old enough, or when I find something that inspires me, we'll probably add something to the bottom of this gallery wall to balance it out a little bit more.

Here's the view when you walk in her room :


And here's how it ties in from that view with the crib / part of the closet.


Three walls down, one left to go!  Kalia's nursery really is coming together...I love going in there and just sitting.  I can't wait for her to get here!!  I might say that a million more times within the next month!

My favorite part of doing her nursery...

Here's where we started with this wall :

Before : gross carpet, gross paint, gross baseboards

and one more of what it looks like today!

After : new floors, freshly painted ceiling, baseboard, and walls, homemade dresser, gallery wall art!
Ahh...SO much better!!  We've come such a long way!  Hope everyone has a great weekend...TGIF!

If you enjoyed this post, please leave a comment or subscribe to the feed reader to get future posts delivered to your reader.


I'm linking up to the parties in my sidebar...go check them out!

Wednesday, April 27, 2011

Nursery Room - DIY Wall Art

I really wanted something big and personal to balance out the mirror above Kalia's dresser.  I wanted to incorporate Chris and I's baby pictures, and add Kalia's pictures inbetween ours when she gets here so we can have fun comparing.

I actually am starting to get pretty tired these days, so I initially bought two 16 x 20 picture frames to do this with, and then my frugal side kicked in and I decided it was absurd to spend $40 on frames that I didn't love (on sale with a coupon at Jo-Ann's) instead of spending $4 on wood to just make frames that I did love.

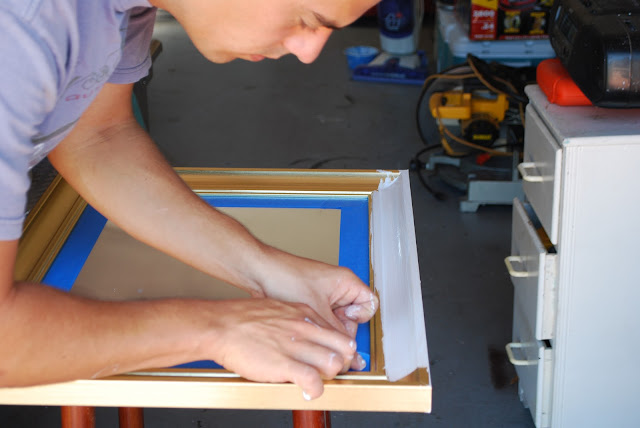
So, I got out the miter saw and built myself two 16 x 20 frames (for a tutorial on how to build picture frames, click here), and spray painted them black.  No pictures of this, but there's a million pictures of picture frames around my blog if you really want to see any!

After the picture frames were built and spray painted, I laid out the pictures I wanted in the frame, and measured where I wanted my rope to go to hang the pictures from to get the proper length.


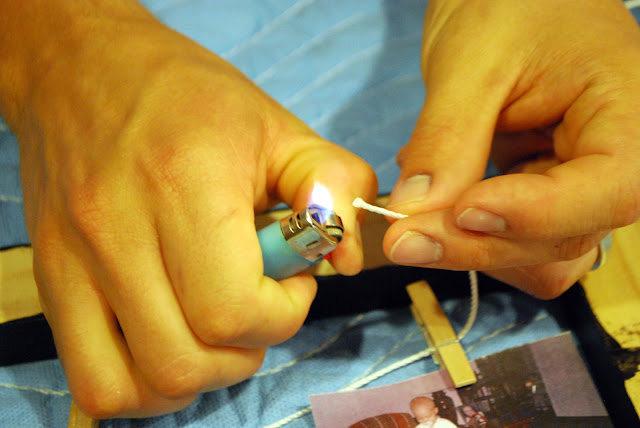
I glued the rope on the back of the picture frame, which is why you see the wood in the picture above.  I waited to glue the rope until after Chris seared the edges of the rope to ensure that the edges wouldn't fray.


I'm pretty sure the glue would've just done the trick (I used quick grip), but my pyromaniac husband insisted on doing it this way!

After the ends were seared, we added the fabric to the back.  We both held on pretty tight to opposite ends and I pulled and stapled along the backside.


We didn't cut the fabric off on the opposite side until after we stapled everything together.  That way we didn't accidentally short change ourselves!

You can see the staples if you look closely.  I guess this was a 'posed' picture...the scissors aren't doing much here, but you get the idea!
Here's what she looked like from the front.


Almost done...next up was to spray paint the baby clothes pins I got at Jo-Anns from wood...


to white ...


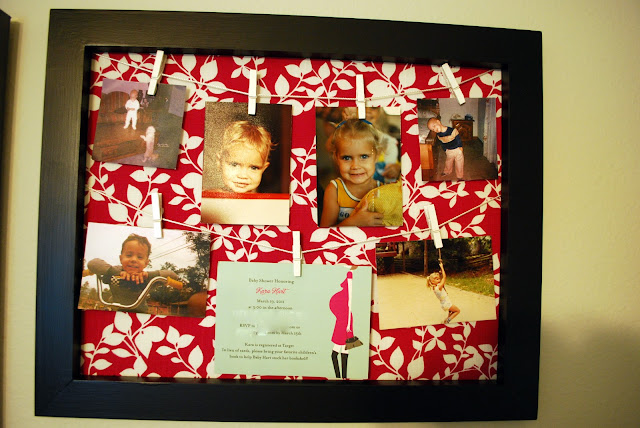
and then add the pictures, and wala!


Custom, personalized wall art for the nursery for less than 10 buck-a-roos for both picture frames.  Not bad, eh?  I found the fabric at Jo-Ann's too...it matches the hue of pink I have going on in Kalia's room perfectly!

I repeated all of that for the second picture frame.


Unless Kalia's blessed with some sort of miracle, she is going to be a bald, bald baby!!  Look at those baby pictures and how bald both Chris and I were!!  And what a chunky monkey I was too!  Here's a few close-ups...

Chunky and bald me!
Bald baby Chris!  At least he was a boy though!!  Everyone thought I was a boy for the longest time!
Stay tuned to see how this ties in with the mirror!  Happy Wednesday!

If you enjoyed this post, please leave a comment or subscribe to the feed reader to get future posts delivered to your reader.


I'm linking up to the parties on my sidebar...go check them out!

Tuesday, April 26, 2011

Mirror Mirror on the Wall

Awhile back, my Grandparents gave me this gold mirror and told me I could do with it what I wanted.  They moved into a new home, so I got some of their old goodies.


I loved the details of the mirror, but the gold wasn't really working with what I wanted it for.  While Chris was priming the hallways a few weeks back, I had him go ahead and prime this mirror too.  I'm lucky I have a husband that goes along with most things!


And then I went to town on it.  I don't have any of the step by step pictures because I just kept making stuff up and adding on another layer.  I wanted it to capture the color scheme I'm using for Kalia's room (that's where this will eventually wind up), so my first layer was a pinkish mixture.  I broke all of the rules and mixed my red water based stain with my white paint, and added a little bit of gray into it.  Then I slopped on layers of my blue from Kalia's closet and dresser mixed with white, followed by some dry brushing of the gray we used to paint Kalia's walls, and finally ended with some dry brushing of just the blue color all on its own.  I added in black paint around the border to sort of give it the black frame look, but still allow the pinkish concoction I came up with show through.  I used my glaze mixed with a little bit of black and slopped some of that on there too.

Seriously, there was nothing neat at all about painting this mirror.  There was no game plan either...I just wanted a layered look that incorporated her room colors.  I stopped when I liked it!

Ready to see?


On this next one, you can see the black dry brushing I did on the outside part to give it more of a black framed look.  I didn't go all black though, I definitely wanted the layers to show through.


Here's a picture of the whole mirror.  Mirrors are so hard to photograph...sorry for the lack of good entire shots!!


And here she is in her new home...


I know, the lighting is off in this picture...and I can't show you the whole wall just yet.  I've got another project to reveal first!  You can tell that this is hanging above Kalia's dresser / changing table though...right across from her bookshelves.

What do you think of my mirror transformation?  Do you like the layered look or would you have preferred just to keep it one simple color?  I'm really into layering paints right now...I just love the effect that it creates!

Hope everyone is having a great week so far...Happy Tuesday!

P.S. Thanks so much for all of your kind comments on my maternity pictures!  So sweet!

If you enjoyed this post, please leave a comment or subscribe to the feed reader to get future posts delivered to your reader.


I'm linking up to the parties on my sidebar...go check out everyone else's transformations!

Friday, April 22, 2011

Maternity Pictures

For my birthday again this year, Erin gave me the gift of maternity pictures. I thought I'd share with you guys a few of my favorite. Erin's so talented...it's such a special gift to give me, and I'm so thankful she took the time to do these for us!

Here I am at my 31 week mark...


The two things I've missed the most with being pregnant are running and volleyball.  Chris and I love to play volleyball together, so this was a fun picture to take that captures 'us' so well!


Funny though...I still think Chris is slacking on keeping up his end of the weight gain even with carrying his volleyball!!  Mine's still bigger!

And finally, here's one of my favorites from Chris and I at the park.


Thanks so much Erin for taking the time to do this for us...such a special friend to capture such a special time in our lives!!

For those of you that are into stats, I had another ultra sound yesterday.  She's already weighing in at a whopping 5 lbs and 12 ounces...with a little more than 5 weeks to go!!  She looks healthy and happy, and we couldn't be more excited for her to get here...hopefully sooner than later!!

Hope everyone has a great Easter weekend!

If you enjoyed this post, please leave a comment or subscribe to the feed reader to get future posts delivered to your reader.

Wednesday, April 20, 2011

We're Not Normal

I know, shocking, right?

Well...not so much if you know us in for real life...and not so much if you've been reading my blog for any longer than 30 seconds.  It's probably pretty easy to figure out that at least I'm not normal.  And Chris loves me and is going to spend the rest of his life with me, so my non-normalcy has most definitely rubbed off on him too.

Besides, if you ask my Dad, Chris was never normal to start off with.  He's from the panhandle of Florida, and again, according to my Dad, you can't be normal and come from the panhandle.  (Sorry any of you normal peeps out there from the panhandle of Florida...it's my Dad, not me.  Take it up with him!).

This post obviously isn't going to delve into how odd Chris and I are...so I'll get to my point already.  The weekend before last, we worked on Kalia's bathroom, which was not at all on our to-do list.

All I wanted to get accomplished was painting the hallway to Kalia's room so that I could hang her growth chart there that she got from my Tampa baby shower and finally put her door back on.  Well, that and a few other projects that will be popping up here shortly, but re-doing the bathroom was most definitely not on that list.

While I was finishing the dresser a few weekends back, Chris got motivated and primed the baseboards and the exterior door frame to Kalia's room...and then got a little over-ambitious and decided since he was already priming the door frame, he might as well prime the other door frames that led to the hallway.  Side note : I spent a lot of time painting every single baseboard with the exception of three rooms (laundry, office, and in-law suite), but waited to paint the door frames until after we painted the doors.  Well, the doors have been painted for quite some time, and slowly but surely, the frames are getting done.

Hallway to the laundry room - You can see the difference in where Chris has primed and what was there previously.  Yellow, yellow, yellow...yuck!
I was on par with that extra effort.  I mean, since I was already going to have the paint out, I might as well do that hallway too.  No biggie.

Besides the trim, the hallway to Kalia's room needed a fresh coat of paint too, so we decided we'd just go ahead and paint the ceiling in there also while we were at it.  I mean, it's a small hallway...small effort.  Chris starts taping down paper in the hallway and Kalia's bathroom.  He said if he was getting out a roller to paint the ceiling in the hallway, he might as well go ahead and paint the ceiling in the bathroom too.

Okay, I'm still on par...makes sense.  I'm a big believer in painting from the top of the room to the bottom, but since I can't stand on a ladder anymore, painting the ceiling wasn't going to be my task.  I painted the walls, leaving the top of the walls for Chris to do, and then after that painted the baseboards and door frames.

While I'm making my way down the 2nd hallway with the trim, I hear a series of loud bangs then "Kaaaraa...could you please open the front door NOW?!?!"  Oh great.  I haul booty as fast as mine will go these days to the front door with Chris waddling behind me holding our old toilet.  Whaaa?

Me : "Wait, I thought you were just painting the ceiling in there.  Why is our toilet in the front yard?!"
Chris : "Well, I am painting the ceiling.  But since I'm painting the ceiling, we might as well paint the wall, and then since you already have the trim paint out, we might as well trim out the bathroom too while we're at it.  I'll paint the ceiling, you paint the wall and trim, and then we'll install a new toilet."
Me : "Kalia's door isn't getting put on this weekend is it?"
Chris : "Go big or go home!!!"

Funny...I thought I was home!!!

I went back to painting the trim in the hallway, and next thing I hear is "Kara...I need your help for a second!!!"

Oiy...I went in and helped Chris pull off the old shower doors.

And then I go in there to look at the bathroom and Chris starts eyeballing the vanity.

Me : "Don't even think about it."
Chris : "But it's so ugly...

And that's how the whole faux granite / painted vanity came to be.  Do normal people go to paint a small hallway and wind up redoing an entire bathroom?!  I mean, I know I'm nesting...what's Chris's excuse?

I spose Daddy's nest too.  Really, this is just about how we did every project in our old house.  Within a few weeks of moving into this house though, Chris started going back for his Master's in EE full time while working full time, so I was the solo crazy one on home improvement projects until we got back from Hawaii.  Now I'm slowing down, and Chris is back on track with our psycho speed!

But...we did get all of the stuff on my to-do list done...finally!

We finished up the laundry room hallway that weekend.

Painted trim, hallway, and spray painted vent white.  Such small changes, but man do we notice a difference!
This past weekend we hung up Kalia's growth chart on her freshly painted hallway:

Painted ceiling, trim, hallway
Growth chart that we can take with us wherever!  She'll...uh...take awhile to 'grow' into it, but if we don't hang it now, it'll get lost!  This is probably the most 'baby' thing I've done for her arrival, but it's so darn cute!
And installed her door again.

We added a wall protector on the back of her door knob too...I'm sure there will be times when that door flies open!!  To see more of Kalia's alphabet wall, go here.  To see more about those pillows, go here.
It's funny how the finishing touches...the little things...can make me so happy!  Any fellow 'not normal' people out there?!  I'm positive we're not the only ones!!

Hope everyone's having a great week so far!  Happy Wednesday!

If you enjoyed this post, please leave a comment or subscribe to the feed reader to get future posts delivered to your reader.
Related Posts with Thumbnails