Showing posts with label shelves. Show all posts

Friday, August 3, 2012

Building Crown Ledges

I am so excited for today's post!  For my very first time, I teamed up with the amazing Ana White to bring you this.  I came across her blog over two years ago when I wanted to buy a bench that was outside of my price point, and found her plans to build one instead.  She is one of my favorite blogs and virtual people to keep up with, and is so so talented.  It's such an honor to work with her!  

As most of the things I build start, I saw this :
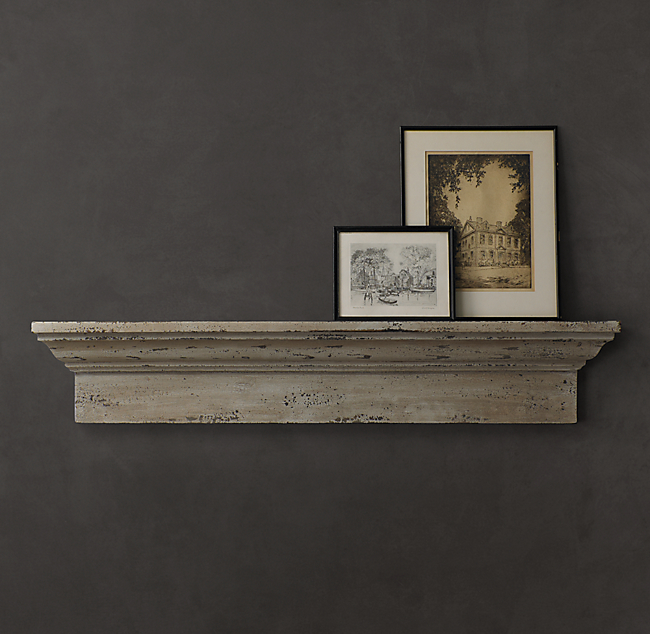
Image Courtesy of Restoration Hardware
And wanted two of the large ones for above the entire length of Kalia's chalk wall.  Except I wanted the finish to be a little bit brighter, more appropriate for a fun playroom...and by no means did I want to pay the $225 plus tax and shipping per ledge for their 75" ones.

I think I told Chris about 100 times that we could build these before he bought into it with me using scrap pieces we had lying around to do a mach up version of these.  They are seriously so simple to make.

Lucky for you, Ana White drew up an amazing how to, so you don't have to follow my scrap board pieces to buld this for yourself.  Just hop over to her site and follow the simple directions!

The ledge is essentially two 1x5's and a piece of crown molding between the two.  We used a 1x4 for the top and a 1x5 for the bottom piece...


...and then used a nail gun to put the crown molding piece in between.


Because our ledges go all the way across the wall, we only had to worry about finishing one out of the four ends of our ledges...which was the only sort of tricky part with this whole project.


For the full tutorial, check out here : Ana White Building Crown Ledges .

After both ledges were put together,


I primed it all and then gave it a few good sandings with my 150 grit sandpaper, followed by a final coat of the 200 grit sandpaper, until the entire thing felt really smooth.


After that, I painted my base coat of turquoise on.  I used left over paint that I had from my sewing cabinet makeover I did awhile back.


I know, entirely too bright, but I expected that!  Like I said, this was my base coat.  Two notes about this...

1.  That orange container you see there is a big thing of Floetrol.  For painting things, it is my best friend.  Especially in this extremely high Florida humidity.  It basically acts as a conditioner for latex paints.  It extends out the drying time and makes it a whole lot easier to eliminate brush strokes.

2.  I almost always do a test run on pieces to see if I can get the desired outcome before just jumping on board with painting the entire thing when they're this big.  I took scraps and painted about a million different color and finishing combinations until I came up with one I liked.  Much easier than being frustrated at the end with all of the hard work you do on a large piece!

After I put the base coat on, I took some leftover gel stain I had (Minwax's Red Mahogony) and spread it generously on top.


My goofy hubs took that picture and then decided that I looked creepy with no head, so he needed a head shot too.  Maybe I was supposed to photoshop these two pictures together, but I don't know how to use photoshop, so you just get the picture.


I wiped off the excess gel stain until I got to a color combo I liked.  There was a minor freak out moment here where I couldn't get the gel stain off quick enough and I thought I ruined the entire thing and was going to have to sand it all down and start from scratch.  Chris (goofy hubs!) came to the rescue and told me to just wipe it down with paint thinner.  That was actually a brilliant move.  I just added a little bit of paint thinner to my rag and went up and down until I got the ledges just right finish wise.  Then I sanded down the edges a bit and added a few coats of polycrylic, and viola!


We added j hooks to the back and mounted both ledges side by side.


Details shots :


Here's our finished ledges at Kalia's birthday party (thanks E for taking these pictures!) :


The total cost of this for both ledges was $100.  That sure beats getting two of RH's ledges for $500 + once you add in tax and shipping, and my ledges are two feet bigger!

So what do you think of them?  We really love how this room is coming together.  It's a really fun bright space!

I'm actually going to do something a little different with pictures on the ledge, I'll have to share what I wind up with at the end.  This was so fun to put together, to reflect back on some of our favorite memories with our little girl.  Where oh where did the last year go?!?!

Hope everyone has a wonderful weekend.  We just got back from a 2+ week family vacation, so I'm really behind in posts.  Hopefully I can catch up with some things this weekend and be back on track.  Happy Friday!


If you enjoyed this post, please leave a comment or subscribe to the feed reader to get future posts delivered to your reader.


I'm linking up to the parties in my sidebar - go check them out!

Thursday, October 28, 2010

Finishing a Goodwill Shelf

A looong while back, when I got my Pottery Barn shelves from Goodwill, I also got another shelf for the daybed room. I actually almost didn't get it because it was $10, but decided that since I didn't have to sand off any of the old paint (it came unfinished), and it had a few curves that I liked, I'd splurge.

I've gone through my pictures to try to find one that I took of this shelf before I did anything to it, and I can't. I purchased these shelves back in April or May, and because I have about 10 projects going on at any one time, it's sometimes hard to figure out which folder I put the pictures in on projects that take awhile. Sorry!

My T. Mom gave me a gallon of green paint when I was over there last, so I first painted this shelf with that (I do love me some free paint!!).


Of course that was entirely too boring to just leave it at that, so I spray painted my heirloom white over top of the green, and then sanded it down with my 100 grit sand paper to get the green to show back through.


While that was more interesting than just the flat color, and I was really loving the look of the characters of the wood showing through, it still didn't have the wow factor that I was going for.

To finish the shelf off and give it that extra wow factor, I dry brushed on the same turquoise paint I've used for my sewing machine cabinet and my other shelves, and then hung it in its new home.


Ahhh...SO much more interesting!!


I really love all of the colors in the shelf because it really does a great job at pulling in quite a few of the different bright and fun colors in that room.


I don't love the decor on the shelf yet, but it's what I had lying around, so it's what gets put up for now!


All I'm missing in this room is window covers, a rug, and building a corner table...and maybe a mirror.  Hmmm...I'm sure I can come up with something else, but I really love the way it's all coming together.

And just as a reminder of where this all started back in May, here's the before...


What a difference 5 months makes, huh?!  (To see each step I did in detail, see the following links : painting the floor, building the left daybed, building the right daybed, finishing old Pottery Barn Shelves, Re-doing a Sewing Machine Cabinet, Making the Yellow Pillows, and Making the Florally Pillows).

I won't be posting tomorrow, so I hope everyone has a great weekend!


If you enjoyed this post, please leave a comment or subscribe to the feed reader to get future posts delivered to your reader.


I'm linking up to the parties in my sidebar...go see what everyone else is making over!

Wednesday, September 8, 2010

Pottery Barn / Goodwill Shelves

Since finding Ana's site, my list to build is 3 million miles long. I know how much things cost to build now, so I refuse to pay for things that are less quality than I could build on my own. Slight problem...I'm an Engineer 50 hours of the week. Time is not my friend.

To help save time on things, when I drop off stuff for donations to Goodwill, I scour to see if there's anything I can just refinish instead of building from scratch.


A few months back I came across two of these shelves.  They're Sophia shelves from Pottery Barn.


For $6.  SOLD!  They needed a little TLC though, so I got to work on refinishing them.  In my head I had a vision of finishing them the same way I did my mail holder, but with the turquoise (that I had left over from my sewing machine makeover) as the underneath layer, and white as the top layer.


First I painted it the turquoise color, and then I topped it with a thin layer of white.  After that all dried, I sanded with my 200 grit sandpaper and was not happy at all with my results.


Not exactly the look I was going for.  It wasn't awful, but it wasn't what I wanted either.  Back to the proverbial drawing board I went.

I decided to mix the turquoise with some of my glaze and a little bit of water and apply it to my shelves.


Too dark!  To lighten it up some, I mixed up some white paint, a little bit of water, and my turoquoise glaze together.


Too light!  Stupid shelves.  From there I started dipping between my turquoise glaze mix and my white/turquoise glaze mix until I came up with something I FINALLY liked.


And because I'm me, and I can't leave well enough alone, I glazed all of the edges.


After I matched that up in the room, I decided I liked the glaze a lot, so I glazed the entire bottom part of the shelves and left the top part with just the whitewash / turquoise color.  I had no idea these shelves would take this long to refinish, but sometimes working with color, and getting the color right is hard.

These shelves went in the someday kids room with the daybeds.  I've actually started calling this room the daybed room instead.  It's the room that my nieces / nephew will stay in when they come to visit, so I loaded the shelves up with things that reminded me of them.  I'm actually missing a picture of one of my nieces...I really need to update my picture selections.  It's on the mile long list.

Here they are on the wall (they're HEAVY!!!).


The tiny little monkey on the left shelf was given to me by one of my nieces as a birthday present.  I've found its perfect home!


I say the word fun a lot.  That little sign is perfect for me!


You know I couldn't leave out a details shot.  I'll end on a few full room shots.


For those of you that want the deets, here they are:
Paint: Behr's Aquatic Blue
Glaze:  Ralph Lauren in Smoke
Any white paint you have laying around.

For the whitewash / glaze mixes, I used twice as much paint as I did water and glaze.  So if I used 4 ounces of paint, I added 2 ounces of water and 2 ounces of glaze.  It all goes really far, so if you try this, don't mix too much!

Next up in this room...replacing the pillows so my living room can have pillows again.  Happy Wednesday!

If you enjoyed this post, please leave a comment or subscribe to the feed reader to get future posts delivered to your reader.


I'm linking up to the parties on my sidebar...go see what everyone else is re-crafting!


Related Posts with Thumbnails