Showing posts with label pillows. Show all posts

Wednesday, March 9, 2011

Pillow Talk - Nursery

The elephant towel I got (from Anthropologie, fyi!) while out on my nursery loot shopping trip with Erin has been my inspiration / color pallet for the entire room.  My plan when buying it was to turn it into a pillow.


So, that's exactly what I did.  I took a brown napkin I had left over from my napkin pillows with fabri tac project in the daybed room, and sewed it onto the back of this tea towel.


And here's the front :


My tea towel was a little longer than my napkin, so I just sewed along the napkin hem, and cut off the excess fabric that hung over.

Wait...shut the front door...did I just say sewed?!  Yep!  I did!!  Erin came over a few weeks ago and taught me how to sew.

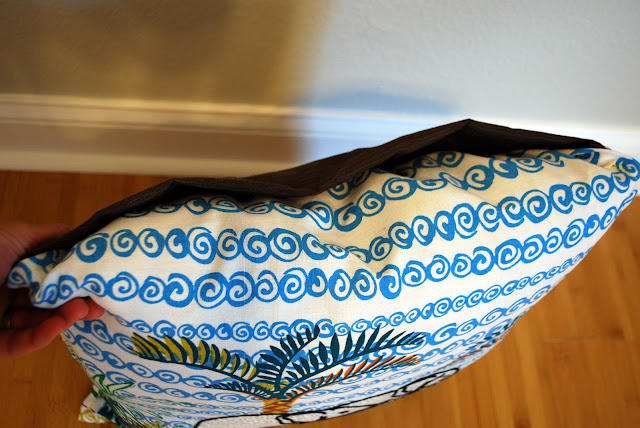
Slight problem though...I'm impatient.  Which doesn't bode well with sewing.  I didn't want this to be a permanent pillow...I wanted to be able to remove the cover and wash it when necessary.  Because I'm impatient, I didn't really think about how to implement that until I got three out of the four sides done.  Then I decided I'd just flap over the pillow for now, tuck it in, and maybe add a zipper later.  So this is where my elephant pillow's top currently stands :


I decided I'd get smarter with my next two pillows I wanted to make.  I had two napkins for the front that I loved the pattern of, and my dark pink fabric accented the back perfectly.

I cut laid out my napkin, and used it to cut out the shape/size of my fabric, leaving excess around the sides to account for seams.


Here's where I thought I got really smart.  To solve my wanting to be able to wash the pillow case dilema, I decided I'd make an envelope style pillow.  So, I cut my back fabric into one third and two third segments...


Used these cool clips to hold my hem line in place


Got excited that my hem turned out semi decent looking...


Sewed the right sides (the sides you want everyone to see) together, and wala!


This is my pillow inside out.  It's not perfect, but you won't see the hem/seam lines because I sewed it inside out.  I was so pleased with myself at this point.  I flipped my pillow cover right side out, and shoved my pillow in...


Woot!!  Minus needing ironing, look how pretty that pillow is!!!

Untill ...

you flip her over...


And then she looks like me when I try to get away with not wearing maternity jeans.  The pillow is too fat!  Sigh.  Realistically I didn't care enough to scrap it.  It's the back of the pillow for crying out loud...and I did it all.by.myself.  I know, it looks like my 5 year old self did it, but that's besides the point.

I really wanted to make two of these, so I decided to cut MORE fabric for the second one for the back.  But I'm impatient, remember?  So instead of recognizing that I was too tired to do this right, I attempted to make my second pillow...

I messed up.  I sewed the right sides together for half of the pillow, and the wrong and right side together for the second half of the pillow.  I know there's tutorials on how to measure for this, but I just decided I needed about an extra 6 inches and went for it.  This is the sad, sad shape of the back of my 2nd pillow.


But again, it's the back, so I don't really care.

I did want to make two MORE pillows though.  I started a different night before bed and decided that since I was tired, I'd resort to my old trust fabri-tac ways.

I cut out my fabric to 20'' (my two insert pillows are 18'', so that allowed for a 'seam'.)


Then cut my line for my envelope...


Then added a bead of fabric tac around the outside of the full pillow and pressed together the fabric.  I let it sit overnight to dry (for two pillows), and had this in the morning for the backside :


I was so excited and anxious to get my pillow inside of here...it really looked half way decent!!  So I shoved it in there, and ...


BOOO!!!  Apparently the magic of fabri-tac is lost on some fabrics.  SO SAD!

Last night I took both of these half put together pillows and sewed them up instead.  They're not perfect either, but hey...I'm just a beginner!  Lesson learned though : sometimes sewing IS easier than fabri-tac.

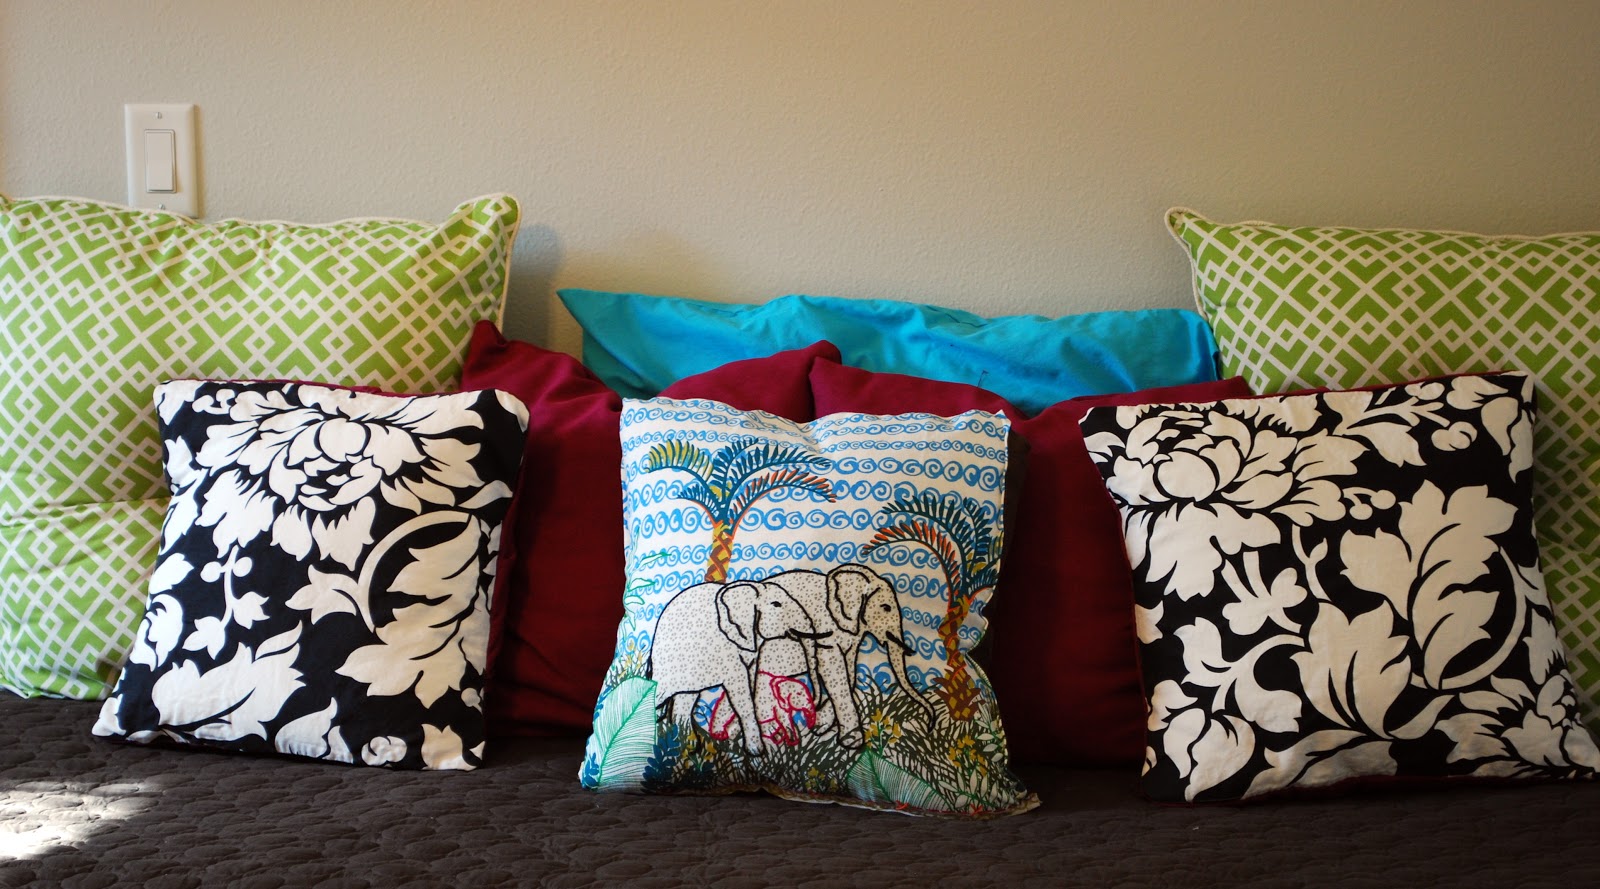
Here's the end result of all 5 of my pillow adventures :


They might be a little rough around the edges, but they're good enough for me!

Yes, I know...worlds longest post on pillows!  I really do love using napkins and tea towels though as my face for pillows.  I can get so much more bang for my buck that way.

Hope everyone's had a great week so far.  I don't know that I'll have time to post again this week, I have my sister in town until Friday morning.  So...I hope everyone has a great weekend too!

If you enjoyed this post, please leave a comment or subscribe to the feed reader to get future posts delivered to your reader.


I'm linking up to the parties in my sidebar...go see what everyone else is 'talking' about!

Monday, September 27, 2010

Napkin Pillows

My living room finally has all of its pillows back after this weekend. Which means yes, I finally got around to making my second set of napkin pillows.


I started, again, with my two napkins facing each other, and then used my fabri-tac to go around the seam.


You should wind up with an inside out looking pillow like this.  Unfortunately, I didn't have anymore extra pillow inserts left, so I had to shove this one with batting.  I think I over-shoved, or didn't break it up enough or something, because it turned out a little lumpy.  That's okay though, it'll wear down eventually, I'm sure.  And if it doesn't, well, I'm sure the 'kids' won't know the difference!


The Fabri Tac stuff is STRONG.  I beat and beat and pulled on these pillows to try to smooth it all out.  That's MY kinda no-sew job!


Here's the pillows in their new home with their fellow pillows.  They're so happy there...they don't even realize that they were once napkins!


And here's a last full room shot.  If you'd like more step-by-step instructions, check out my other post on how I made the first set of napkin pillows, which are the flowery ones on the right daybed.  Just a few more things left to do in this room to get it finished up...sigh...one day!

Hope everyone had a great weekend!  Mine wasn't as productive as I would've liked, but I did get a few smaller things done.  Stay tuned to see what else I finished up!

If you enjoyed this post, please leave a comment or subscribe to the feed reader to get future posts delivered to your reader.


I'm linking to the parties in my sidebar...go see what everyone else is crafting!


Wednesday, September 15, 2010

Making Pillows

I don't really toot my own horn all that much, but I have to on this post. I'm a genius. Seriously.

A little while back I did my placemat pillows, and I thought I was so smart. I received a bunch of comments telling me I was, and a few saying they had done the same thing. Sigh...so I'm not so original, even when I think I am. And I'm probably not the first one to come up with this next ingenious idea, but I refuse to google around to see if anyone else has done the same thing just yet. I'm basking in the awesomeness of being so smart.

So what is it already?! Well, the placemat pillows were great, but they had one downside. They're pretty small. It's hard to find large enough placemats to stuff for bigger accent pillows.  While I was pondering this in the placemat isle in Target, I couldn't help but notice the napkins section.  The napkins were exactly the colors I was looking for.  I took them out of the packaging, and a light bulb in my head went off.  Napkin Pillows!!

Those of you that have been following my blog for sometime know about my love of Fabri-tac.  From my bench cushion, key  art, placemat pillows, mini planter makover, and most recently the Nursery Monogram...anytime I need to sew something, I fake it with the magical stuff.  I think in fabri-tac.  Sad?!  Perhaps... convenient, most definitely!

Enough already...onto the tutorial!


Start with two napkins of the same size (mine were 20 x 20).  I used a brown napkin for the back, and the floral napkin for the front.


Place both napkins with the part you want showing towards each other.  Run a bead of fabri-tac along the hem / seam of the napkin and press together.  Repeat for three sides, making sure to keep your hem lines straight.


You should wind up with something looking like this.  Flip your new pillowcase right side out.


Then shove a pillow inside.  I actually had an old pillow that I haven't used for quite some time in a closet, so I shoved it in my pillow cover.


I did the last part two different ways to see which one I'd like better for future pillows.  You can either  run a bead of fabri-tac on the hem line and press it together to finish it off with a more crisp look like the pillow above...


Or you can fold over both hems and glue them together like you did the rest of the pillow.  Whichever you like better!


Here they are in their new home!


One last full room shot.  (Like what you see?  Check out my posts on painting the floors, building a daybed, building the second daybed, refinishing a sewing machine cabinet (one day I'll learn how to sew), and making over shelves I found at Goodwill.)  Next up on the pillow list is putting the two white pillows on the left side back into my living room.  I've already got the napkins ready!

The best part of all of this was the cost.  For the florally four pack of napkins, I paid $10, and for the brown I paid $8.  That'll make me four pillows, and these colors go perfectly with the rest of my house, so everything is interchangeable.  I already had the pillow inserts, so those cost me nothing!

Cost per pillow = $4.50.  Oh yeah!

Stay tuned for Friday's post...I'm hosting my very first giveaway for followers of Kara's Korner!

f you enjoyed this post, please leave a comment or subscribe to the feed reader to get future posts delivered to your reader.

I'm linking up to the parties in my sidebar...go see what everyone else is thriftily creating!


Tuesday, July 20, 2010

Placemat Pillows

Want to know an easy way to make accent pillows on the cheap?  Use placemats!

I still haven't figured out how to use my sewing machine (or even attempted to be quite honest), so these pillows are no-sew.  Perfect!

All you'll need is thick placemats of your liking, some fabri-tac, a straight edged knife, and some batting for the insides.

I bought a pack of 4 of these placemats from Marshall's for $9.99.  I wanted something blue and yellow to go on my couch, and these were perfect.*sorry about the image quality, my camera battery was dying!:
Front:

Back:

When buying placemats, make sure they're essentially two sides stitched together, like this:


Take your straight edge along the seam to pull out the stitching.


You just need to make the hole big enough to fit your hand in, you don't need to slice the whole thing in two pieces.


Shove in your batting.


Run a bead of fabri-tac alongside one edge of your seam


Push together for a few minutes and wipe off any excess glue.  And wala:  cheapo updated pillows:


And here they are in their new home:


Not a bad little update for $2.50 for each pillow!  We had actually just bought new bed pillows at Marshall's, so I washed our old pillows and then tore those opened and use the batting inside, so my total cost for this project was $10!

I'm linking up to these parties...make sure you checkout everyone else's creative creations too!  

P.S.  Sorry I've been MIA.  We're working on a few big projects, and I was out yesterday with a migraine!
Related Posts with Thumbnails