
 |
| Image courtesy of Pottery Barn |
When my sister and I planned a date for her family to come over, I immediately went out and got the wood to build another daybed so that both of my nieces could have a place to sleep.

I have had this picture in my sneak peak section for forever...close to three months...entirely too long! In my first daybed post, I wrote that next time I'd paint before building. So that's exactly what I did. I sanded, primed, sanded, painted, sanded, painted, and then built.
The problem with this approach for me is that I'm not a professional builder, and my pieces don't go together perfectly. So, I sanded and sanded and sanded once I got the boxes together, which meant inevitably, I removed a lot of my paint and had to repaint the entire thing a million times (paint, sand, paint, sand, etc.)
I did manage to get the bed put together before my nieces came over, but I hadn't re-painted any of it yet and you could definitely tell it needed quite a few more coats. I thought I took pictures of this, but I can't find them, so you only get the finishing pictures. I did exactly the same as the daybed back in May, so if you'd like more step by step pictures, or the finishing details, go here to see them.
Ready to see the finished product?!
Here she is!

Of course I have to add a few details shots too. I sanded down the edges again so I could emphasize the clean lines look, stained them, and repainted around the faces to keep it bright and white.


Here's a picture of both daybeds in the room next to each other. Yes, the pillows have changed. I'm still working on getting everything there...I stole the yellow and white pillows from my living room.
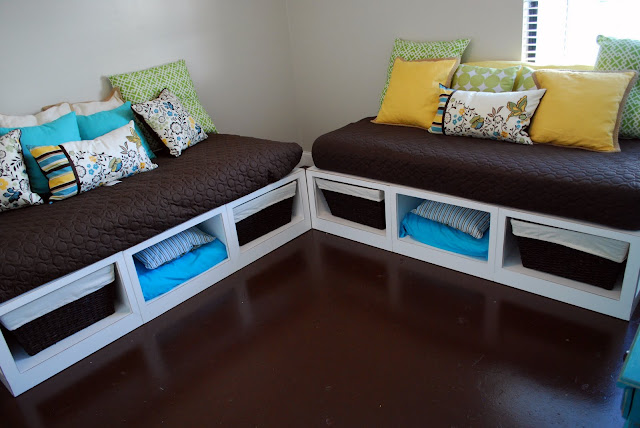

You'll never be able to see these sides most of the time...I plan on putting a table here, but I still wanted to show that I at least finished them.
I've made so much progress in this room, but it still has a ways to go. It's not perfect, but it's miles upon miles better (and at a reasonable cost!) than what I started out with...which was this:

I've painted the floors, painted the trim, painted the doors and door knob, built a daybed, revamped an old sewing machine cabinet, and now finished building another daybed.
Let's end on one last cheery picture...
 Ahhh...SO much better! Do you agree?!

f you enjoyed this post, please leave a comment or subscribe to the feed reader to get future posts delivered to your reader.
I'm linking up to the fun parties in my sidebar...go check out what everyone else is creating!

I have had this picture in my sneak peak section for forever...close to three months...entirely too long! In my first daybed post, I wrote that next time I'd paint before building. So that's exactly what I did. I sanded, primed, sanded, painted, sanded, painted, and then built.
The problem with this approach for me is that I'm not a professional builder, and my pieces don't go together perfectly. So, I sanded and sanded and sanded once I got the boxes together, which meant inevitably, I removed a lot of my paint and had to repaint the entire thing a million times (paint, sand, paint, sand, etc.)
I did manage to get the bed put together before my nieces came over, but I hadn't re-painted any of it yet and you could definitely tell it needed quite a few more coats. I thought I took pictures of this, but I can't find them, so you only get the finishing pictures. I did exactly the same as the daybed back in May, so if you'd like more step by step pictures, or the finishing details, go here to see them.
Ready to see the finished product?!
Here she is!

Of course I have to add a few details shots too. I sanded down the edges again so I could emphasize the clean lines look, stained them, and repainted around the faces to keep it bright and white.


Here's a picture of both daybeds in the room next to each other. Yes, the pillows have changed. I'm still working on getting everything there...I stole the yellow and white pillows from my living room.


You'll never be able to see these sides most of the time...I plan on putting a table here, but I still wanted to show that I at least finished them.
I've made so much progress in this room, but it still has a ways to go. It's not perfect, but it's miles upon miles better (and at a reasonable cost!) than what I started out with...which was this:

I've painted the floors, painted the trim, painted the doors and door knob, built a daybed, revamped an old sewing machine cabinet, and now finished building another daybed.
Let's end on one last cheery picture...
 Ahhh...SO much better! Do you agree?!
f you enjoyed this post, please leave a comment or subscribe to the feed reader to get future posts delivered to your reader.
I'm linking up to the fun parties in my sidebar...go check out what everyone else is creating!
Oh my word! I'm totally doing this in my ski condo! I've been looking for a day bed to go in our bedroom for extra kidlets...why didn't I think of building one?!? Sometimes I just need someone to get me started. Thanks :)
ReplyDeleteI'm wanting to foster adopt, but couldn't afford those expensive beds, this will be perfect!
ReplyDeleteLove those beds. I have always love that look with the two beds and a table. My rooms are too small. Yours looks great.
ReplyDeleteBrooke
love it! love it!
ReplyDeleteWhoa! Totally looks amazing! Loving the colors!
ReplyDeletegreat job! I love your new day beds! I love the colors too!
ReplyDeletegail
Amazing job! Great choice in colours and fabrics too!
ReplyDeleteKara, another amazing project! Love your daybeds. I must feature you!
ReplyDeleteOkay - I'm just a little bit jealous! I LOVE your double daybed look! I so want to do this in our sunrooom. LOVE LOVE LOVE the throws and pillows you chose -- they're awesome! Great job, Kara!
ReplyDeletei think it looks GREAT! love the colors too!
ReplyDeleteThis is beautiful! The color combo is perfect!
ReplyDeleteBEAUTIFUL! Those pillows are gorgeous as well. Great job!
ReplyDeleteNew follower here...this is fabulous!
ReplyDeleteThis is incredible! You're so talented! I love the idea and so much storage!
ReplyDeletesilverrosesewing.blogspot.com
Wow! These are incredible!
ReplyDeleteThose beds look awesome! I love Ana's site, but haven't gotten the guts to build anything yet. You're a better woman than I!
ReplyDeleteHi! I stopped over from Trendy Treehouse! I LOVE these!! You did a fabulous job!!! I have an issue when my kids want someone to spend the night and there is nowhere for them to sleep. This may have solved my problem!! I am going to go take a look at your first one! Thank you!!
ReplyDeleteWhat a wonderful re-do...love the colors you chose. We are getting ready to move, and I really want to make one of these!
ReplyDeleteThese look great! I am actually thinking of doing something like this in my family room. I know...a little crazy, but I have a very small townhouse and have no room for a guest bedroom, so it would serve double duty...And be comfy for watching movies. Great job!
ReplyDeletethanks for linking to TAke-a-Look Tuesday over at Sugar Bee Craft Edition - I featured you today!
ReplyDeleteGorgeous! I love the colors and the distressing - awesome job!
ReplyDeleteWow, Kara! You really outdid yourself! These look fabulous! I love your painted floor too!
ReplyDeleteOh Em Gee!!!!!!!!!!!!!!! I can't express how AWESOME this is!!!!!!!!!! Thanks so much for linking up to gettin' crafty on hump day! :)
ReplyDeleteLove this! What did you use for the padding or the mattress part? love the color scheme!
ReplyDeleteNew follower from the linky party
Carole
http://frogbellysoup.blogspot.com/
These look wonderful! I actually clicked to this post after reading about all the trouble you had making them, so they look even better than I'd expected :)
ReplyDeleteThanks for the kind words everyone!
ReplyDeleteCarole, I used a daybed mattress that I purchased at Sam's. They're twin sized, but not as thick as a normal mattress. They're 8'' in thickness instead of the 11'' that a standard twin mattress is.
LOVE IT!!!! I am hosting a Thursday Linky called Thrilling Thursday. I would love for you to stop by and link up!
ReplyDeleteThrilling Thursdays @Paisley Passions
~Lori
Thanks for linking up! I am just in love with these daybeds! I hope you will join in on the party again next week :)
ReplyDeleteHaha I'm SO on the same page as you as far as furniture pieces not fitting together right. Like I say, square furniture = so overrated. Great job!
ReplyDeleteThe daybed looks great! Haven't had the courage to build one of Ana's projects yet. Where did you get the flowered pillows? Do they have black or brown in them?
ReplyDeleteI love this! And the colors you chose are gorgeous! Great job.
ReplyDeleteAwesome! I gonna head over to your other post about how you built them!
ReplyDeleteYou are amazing! I would love to build something like that. I'm going to go check out her plans now. :)
ReplyDeleteIt looks wonderful!
ReplyDeleteThose are fabulous! We made a table with Ana's plans ... LOVE her site! You really did a great job on the daybeds.
ReplyDeleteWOWZERS ! Those look amazing ! GREAT JOB !!!!!
ReplyDeleteThanks for sharing,
gena
www.thehouseonlavenderhill.blogspot.com
These look fabulous! Love the colors you used too! Thanks for sharing!
ReplyDeleteThese are awesome! I want one for my daughters bedroom now!
ReplyDeleteThey look so great! Awesome work!
ReplyDeleteKara, these look so great, i love how you distressed them! I wanted to let you know that we are planning on featuring it tomorrow. We hope that you get a bunch of new visitors.
ReplyDeletewww.remodelaholic.com
I am absolutely drooling for these, you did a fabulous job!! Bravo!!!!
ReplyDeletelifeofperks.blogspot.com
Wow, these are amazing! I wish I had a room to make these in! Love them! You did a great job!
ReplyDeleteJenn
www.sanitycraft.blogspot.com
Amazing project. They are every bit as good as the Pottery barn ones. Your hubby is a keeper :)
ReplyDeleteWhat is the weight capacity for these day beds?
ReplyDeleteamazzing idea i would love to do something like this
ReplyDeleteHi MS - I'm not sure the technical weight limit, but I'm sure it can hold quite a bit. It's got the middle piece in there for added support along with the side pieces on either end. I know we've had four grown adults on there with no problems.
ReplyDeleteHope that helps!
Four grown adults at the same time? That'll more than suffice!
ReplyDeleteOh My Goodness! Those are adorable! Great job with them!
ReplyDeleteAmy
crazycraftbugs.blogspot.com
Amazing job! I love the detail and finish work!
ReplyDeleteLove it!! I'm in the middle of building one and was wondering if the three boxes are screwed together?
ReplyDeleteThanks! I did not screw my boxes together...they are impossibly heavy to move this way, and I don't know that we could've gotten them in the room. If you're going to screw them together, definitely arrange the boxes the way you want them, make sure you love it that way, and then screw them together in that exact spot where you plan on leaving it. The boxes are so heavy that I haven't had any problems at all with them sliding around. Good luck with your daybed!!
ReplyDeleteI just saw you over at envirocraftiness and spotted these day beds that you made! These are fantastic and you did a great job:D I think I have another project in my near future! Thanks for the inspiration.
ReplyDeleteHi Kara,
ReplyDeleteI am so happy I found this site! It is exactly what I was looking for.
I just have one quesitons about the blanket on the matress. Did you buy this or make it yourself? If you made it yourself do you have any tips in making them? I love them sooo sooo much.
Thanks
I am thinking about making two of these beds for a very small room. If I shoved the right-hand side bed against the wall, would one cubby be covered up by the other bed or one and a half cubbies? Hope that question makes sense!
ReplyDeleteGood Job! I love it
ReplyDeleteMaybe I am an idiot but I couldn't find the dimensions of the pieces? If you are able to provide this, please let me know! Thank you!
ReplyDeleteNevermind, I found the link! Sorry.
ReplyDeleteHave you ever put the two day beds together for a double/queen bed for guests?
ReplyDeleteNo, it's not a bad idea, it's just that the twin sized dimensions are closer to a king (39 x 75 for the twin, 76 x 80 for a king vs. 54 x 75 for a double and 60 x 80 for a queen), so I'd have to have an extra long twin to account for the length and then hope my sheets stretched to cover both. The largest sheets in my house are queen sized :-). I guess you could use beds pushed together but slept on separately, but we haven't done that yet! We have another queen sized guest room too, so we really haven't had the need to. Hope that helps!
Deletethanks so much!!!!
DeleteWow — what a fantastic project, Kara! The two daybeds look absolutely beautiful together and you’ve really pulled off that matching set look with style. I love how you sanded, primed, painted, sanded again (I feel your pain!) and then stained the edges to give it that clean-yet-rustic finish.
ReplyDeleteIf you’re ever looking for covers for the mattresses or cushions on those daybeds, you might want to check out The Cover Company UK — they offer custom daybed covers and removable slipcovers, which might save you all the repaint-and-sanding hassle in the future.