Showing posts with label stain. Show all posts

Monday, August 20, 2012

Tutorial : Hanging Purse / Diaper Bag Rack

I was going to call this Hanging Coat Rack, but lets be real, it's like 100 degrees here in Florida, and there is not a coat in sight around this house!

I made my mail holder for my office almost two years ago.  It's held up great, and we use it all of the time, but there is one problem with it.


See that purse?  It's a wee bit small to fit all of Kalia's stuff in when we're heading out.  So the mail hanger has gotten to be quite crowded with all of our various bags we keep stalked up and ready to go around these parts.  We've got a Mommy bag, a Daddy bag, a gym bag, and a beach bag that we hang regularly, along with the bjorn, Kodi's leash, and few other miscellaneous things.  The hooks on the mail holder weren't cutting it anymore.  They work just fine, we just need more.

I saw this on One Kings Lane and immediately got inspired to do something about it.

Image courtesy of One Kings Lane

This was perfect, and with some left over scrap wood, I knew I'd be in business.

Here's how I recreated my own version.

First up, I got out my scrap wood.  My dimensions wound up being pretty close to the inspiration piece, although I think mine is a little bit taller.  It is 25" x 9".  The small boxes I cut into 5" squares.


After all of my little boxes were cut, I sanded with 150 grit sandpaper.  I sanded until my arm almost fell off the edges were round and pretty.


I used these three stains I had left over from my American Wall Art I did awhile back.


I stained the back board white, and here's what my little blocks against it looked like :


After that, I taped my little blocks and stained with the white...


...then the blue...


...and finally I taped,

and applied the red stain.


When I was done, I was left with this :


I gave it all a little bit of distressing with 200 grit sandpaper, focusing on the edges.


I purchased hooks at my local home improvement store, and traced out where I wanted the holes to go....


...and then pre-drilled out the holes prior to installing the hooks.


After that, I just installed the hooks and used wood glue to apply the blocks (using my laser level to make sure they were all even), and viola :


Storage solution fixed!   I hung it in our laundry room, which is the perfect place to drop off the bags as we come in and out of the garage.  Now we've got two storing options.  If we come and go out of the front door (which we do when we jog or bike down to the Y, Publix, or the park), we've got the trusty mail holder, and now when we come and go out of the garage, we've got this!


Most of the time at least one of these bags is in the office room on the mail holder, but I put up all of the bags we had sitting on top of the washer (which drives me bonkers), and snapped a quick pic before having to go rescue Kalia from doing some sort of suicidal activity...like trying to drown herself in the toilet!

So what do you guys think?  Anyone else have a million bags hanging around, or are we the only ones that like to switch it up constantly?

Hope everyone had a great weekend!  Happy Monday!
If you enjoyed this post, please leave a comment or subscribe to the feed reader to get future posts delivered to your reader.

I'm linking up to the parties in my sidebar, go check out everyone else's DIY projects!

Monday, April 30, 2012

Staining the Fence

Wanna know a great way to lose an extra few pounds and your mind at the same time??  No?  No one else wants to go crazy too?  Well, it's a rhetorical question, so I'm gonna tell ya anyways!

Decide the afternoon before one of your best friends is coming in town with her 9 week old baby to restain your entire 400 linear foot fence.  All while the house is a disaster.  I at least started on it while Kalia was napping, and she thankfully took a two hour nap before waking up!  Chris was on baby duty while I finished up.

We're re-sodding the back yard (post soon!), which is one of those projects where in order to do that correctly, you have to get other things done.  If anyone has ever stained a fence, you know that the stain kills anything and everything around it.  So I wanted to stain before we re-sodded.  So at 3:30 on a Sunday afternoon, I started.

Here's what the fence looked like previously :


We installed it when we first moved in...literally that first week.  I don't know why we thought that would be a good task to take on ourselves, but it's one of the few things I wouldn't do again.  Building an entire fence with two people while you're moving is quite a bit of work!   I did one coat of stain on it a few weeks after we built it, and never got around to doing the second coat.  I actually started staining using a paint brush, and only made it about 12 ft before Chris came home with a spray gun and let me know that was absolutely ridiculous.


The sprayer is so so much quicker and nicer, but it's a pain to clean.  We've got a system that works for us -I stain the fence, Chris cleans the sprayer.  My legs were sore sore sore from staining this.  In order to keep your stain from streaking, you have to do nice and even coats, which means you need to go up and down the fence panel with your sprayer.  I think I did about 1000 squats.

But hey, my sisters wedding was yesterday, and I've been trying to get back into pre-Kalia shape for it!  I get my workouts where I can these days!

The work was definitely worth it...here's what the fence looks like now :


Chris snapped up a few action shots of me moving my stain.  As always, Kodi was helping!


Chris : "smile!!"  Me : "Seriously?!?!"
And here's a good one to show you a side by side comparison of before and after with what a huge difference the new stain makes!


I promise it'll look so much better when the sod is actually laid instead of that huge dirt patch that's in the back.  Stay tuned for a post on that!  We do have one area of grass that's decent in the back, so here's what our nicely stained fence will look like once we get finished installing the sod :


We're actually on a big kick to get a lot of the exterior projects to the house while it's not too terribly hot out.  Anyone that lives in Florida knows that doing a ton of exterior house projects in the middle of the summer can be brutal!

Anyone else getting exterior projects done while the weather is still nice, and not too hot?  I have a feeling the hot summer months are going to slip up on us before we know it!

Happy Monday everyone!

If you enjoyed this post, please leave a comment or subscribe to the feed reader to get future posts delivered to your reader.


I'm linking up to the parties in my sidebar, go see what kind of workouts everyone else is getting!

Friday, May 27, 2011

Mini Living Room Project

I know, you guys can't believe I'm so close to my due date and still doing projects.  Me neither.  I think breathing these days is a project in and of itself.  But things that would normally get put on a 'list' drive me nuts right now, so if I can muster the energy to get something done, I do it.  Even if it's small.

After we moved the cable, I noticed the shoe kick around the fireplace just looked...off.  It's too light, doesn't blend in with the floors, and certainly doesn't go with the fireplace.


It didn't bother me as much when the obnoxious cable was running across the harth, but now that the cable is gone, the shoe kick bothered me.

When we redid the front door, we stained the shoe kick to match the floors, and I was completely amazed at how well our 'already had on hand from another project 5 years ago' stain blended in with the floors.  I have plans to do do something else to that fireplace, so I decided that I wanted to stain the shoe kick to blend in with the floors instead of painting it to match the fireplace.

So, one night this week, when my big 'ol body couldn't get comfy, and my hubs loud snoring wouldn't allow me to fall back asleep, I got up and stained the shoe kick.


I think this needs one more coat (we did two on the front door shoe kick) to officially be done, but I might have to enlist the helpful hubs to do the second coat.  Scooching around on my rear in the middle of the night to do this did not feel so awesome.  To be completely honest though, as of me typing this post, he has no idea that I even got up to do this, or that it's done.  I'd be in so much trouble if I got caught doing this in the middle of the night!  I'm pretty hard to slow down, even when I'm exhausted.

It looks much better than it did before though.  I'm happy it's not screaming out "hey, look at me, I don't match".  Because that, my friends, was getting annoying.

Hope everyone enjoys their 3-day weekend.  My tired body and tired brain are excited to have an extra day off of work.  Why in the world I thought it'd be a good idea to work up until Kalia gets here is beyond me.  For future reference for any of you guys, working up until your due date (and even possibly past...please Kalia come this weekend!), isn't recommended.

Keeping my fingers crossed hoping that Kalia comes by her due date, which is Monday.  I know, I know...enjoy the carefree life with just Chris and I...it's just hard to enjoy when you can't breathe, sleep, or get up from low places on your own, let alone are a constant sweat ball from this amazing Florida heat.  Come on Kalia!!!  Yes, I think I said that I was ready for her to get here 3 or 4 times in this post. That's how ready I am though....

Happy Friday everyone!
If you enjoyed this post, please leave a comment or subscribe to the feed reader to get future posts delivered to your reader.

Monday, May 23, 2011

House Numbers

Well, I'm still here...and Kalia's still not.  But it's most definitely not for lack of trying.  I'm keeping myself as busy as my tired body can handle these days!  Sigh...

Onto weekend projects...

We live in a community with a Homeowners Association (Chris was actually president last year...however funny that is!), and in our spring time mailing this year we received a friendly reminder that all of the houses needed to have the house numbers located on the actual house per the guidelines.  Hmmm...we've neglected that for 2 years now...oops!  The previous owner actually took the numbers with them.  How odd would it be if they actually moved somewhere with the same exact house number?

Anywho, on one of our many trips to Home Depot within the past few weeks, we picked up a wooden plaque :

Image courtesy of Home Depot

and these big plastic numbers :

Image courtesy of Home Depot

I forgot to take pictures of the actual purchase, but these are exactly the same ones we bought.  We actually wanted to test out the stain we had gotten for the front doord on something before committing and applying it to such an expensive purchase, and then hating it, so this plaque was perfect.  I told Chris that we could just use scrap wood and make our own plaque, but once we realized the plaque was only $5 smackaroos, I let Chris talk me out of attempting to tackle yet another project.  Although it would've been really easy, bending over to even use tools is a challenge with this big 'ol belly I'm rocking these days, so he won.

I applied two coats of stain on the plaque, and we decided we really liked the color, so we did the front doors with it.  Last weekend we had a marathon spar urethane session going on.  We applied a coat to the front door, this plaque, planter stands we got for the back pool deck area, 


and our hammock (which I like to refer to as 'the boat' since it was hammock-less while we were applying the urethane coats on it)...and then repeated the cycle again...and again.


We thought about getting plants for these planters this weekend, but I got too tired.  Those might wait until after Kalia gets here.  If she ever gets here...I guess technically my due date is in one more week, but I feel like I've been pregnant for 10 years already!

Sorry...pregnant brain absent mindedness...back to the house numbers...

Chris test sanded the plaque before officially deciding it was my job to sand the front doors because he wasn't any good at it, but I think it's just the different qualities of wood.  The sanding job scratched some of the stain off (we sanded with 220 grit sandpaper after applying two coats of stain and letting that dry overnight, but before adding the spar urethane), but it wasn't enough that I thought it was worth re-staining and then waiting to add the urethane to it.  It just gives it character now!

This weekend I added the three coats of spar urethane to the back of this plaque, and we made yet another trip down to the big orange store to buy some stainless steel screws.  After adding the plastic numbers on, here's what our house number sign looks like :


I think between the sign, the plastic numbers, and the screws, we spent about $12 on this.  I really love that it ties in with our entry way with our new front door too.


I plan on spray painting all of the lights on the front of the house the oil rubbed bronze, and that statue in the front has been on my to-do makeover list for forever now.  It's way heavy though, so it's something I'm waiting to tackle until I'm un-pregnant.  We'll get around to doing those two things when we repaint the rest of the house.

I think both Chris and I were shocked at how big the numbers actually look against the house, but I think the plaque does a good job of making it something pretty instead of just having the numbers there.  What do you guys think?!

Hope everyone had a great weekend!  Ours was entirely too short.  How is it that when you're this far along with pregnancy time seems to fly and stand still all at the same time?

Happy Monday!

If you enjoyed this post, please leave a comment or subscribe to the feed reader to get future posts delivered to your reader.

Friday, May 20, 2011

Shut The Front Door

Just as a refresher, here's where the entry way started :


And here's where it was after my quick makeover of it a year and a half ago :


Which wasn't bad, it just wasn't great either.  And it left us with zero privacy, which was no beuno.

The rest of the 'door story' isn't so quick, but I'll try to summarize so my post isn't a buzillion miles long! (Note...I fail miserably at this...if you just want to see pics, scroll on down!)

We saw Home Depot had a 15% off special order doors, which we knew we'd have to have because of our size, so we went into check it out...months ago.  Like back in January.  We found a door we liked that was marked down to $875 for the double doors, which was an amazingly great price, so we went to the door sales guy to place the order.

And the bill came up to something close to 2k.  Umm...no, I want the $875 doors please.  Apparently the door prices were mis-marked, but he did go through door company after door company, and threw in promo after promo to get us down to the $875 price.  We had a 10% off coupon too, and he told us to go up to the service desk to pay for it, and we could use it there.  Apparently they're not allowed to double dip, but if you go up to the service desk to pay, they don't know that there's been promotions applied already to the door, so you can generally get away with using another 10% off coupon.

Sa-weet...cha-ching!  That left our door price down to right around $800 after all of the promos had been taken off and applied, and taxes added back in.

The door was supposed to be in a little over two months ago.  It came late, and it came with all sorts of mistakes.  The hardware wasn't the oil rubbed bronze, the door was flat instead of having an arch paneling, it wasn't double bore holed (holed for two entry way handles), and it opened on the wrong side (we switched the configuration to open on the right side instead of the left).  All of which we didn't realize until we got home with this big huge heavy door and managed to get it in our garage.

I called HD and told them to come get our old door and order us a new one.  For some reason, they were a whole lot more accommodating with me than Chris.

Fast forward two months, and our new door finally comes in.  The guy swears that everything's checked out with it, so Chris goes by and picks it up and brings it home.  After getting THAT one out of our truck, we realized it was missing a piece of weather stripping.  I called and told them that they could bring me by a replacement piece that day because we weren't driving BACK to HD for just weather stripping.  My pregnancy hormones must've been in full gear, because they gladly obliged.

Oh, and they took an extra $107 off the door.  Sa-weet.

Well, now the big conundrum is how the heck we're going to install this massive door.  There's no way I can hold it being 9 months pregnant, and there's no way Chris can do the door install by himself.  So...Chris searched around, found a door installer, and had him all set up and ready to go for the week before last.  Happy happy joy joy dance all around.

And then the guy emails, says it wasn't worth his time, and he wasn't interested in doing the job anymore.  Yeah, he emailed that the night before he was supposed to get here.  Great.

So, Chris called around some more, found a handy-man that charged $25 an hour, and got put on his list.  The problem?  His first available day was June 9th.  My due date is May 30th.  Oiy.

But I've taken the approach on whatever gets done before Kalia gets here, gets done.  Whatever doesn't wasn't meant to be.  June 9th it was.

The guy called this past week and said he had an opening and would we like to be squeezed in.  Yes please!!!  I was on strict request to hold Kalia in until the front door got installed.

Can you even imagine?!  The thought of no front door whatsoever is WAY worse than the thought of a glass front door, but we really wanted that new door installed.  And...we're not the type to be able to just sit around and WAIT for things, so...I stopped doing my labor dance and sat on my rear all day long trying to NOT encourage labor to get here.

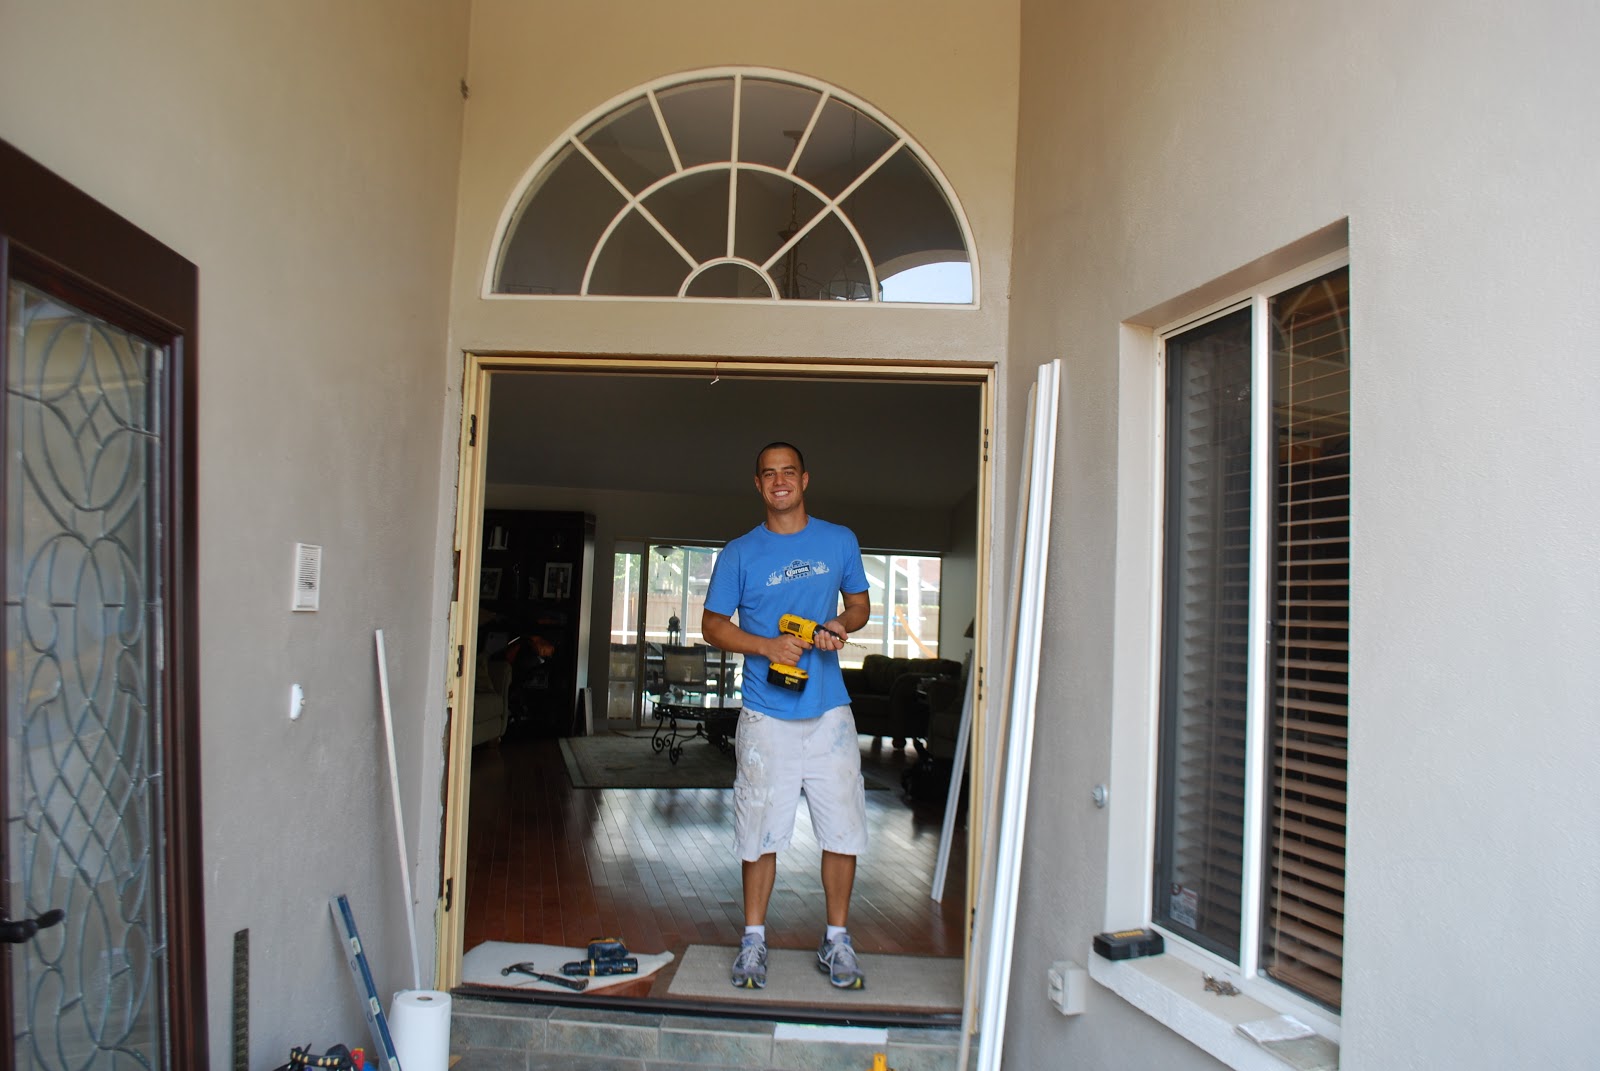
Here's Chris beaming at lunch time...after they got the old frame out, and the new one in, and it was all plumb!

As you can see, installing new front doors is way more than just taking off the old ones from the hinges and installing new ones!
Do you see the one causality from ripping out the old door?


Apparently the old shoe kick thingy ma bobber (yes, that's my technical term) was screwed into the concrete under the tile, so when it came out, my piece of tile popped right off.  Sigh...put it on the to-do list.  We really weren't too concerned...we were just excited that our new front door was going in!

And after a loong day (6 hours with the handi-man, 3 extra hours with just Chris), our new front door, with our old hardware, was installed.


Look at how pretty those doors are!!


And here's a VERY happy Chris after the doors are in.  Chris helped the handy-man to speed up the process, which saved us a ton of loot in the long run.  They worked hard...all.day.long!

This past weekend, we worked on getting the doors finished.  On Saturday, I sanded down both doors (Chris doesn't trust himself with a sander and anything expensive just yet), and then we each took a door and stained it.  We waited the recommended 4 hours, and then applied another coat of stain on it.

On Sunday, we applied THREE coats of water based (low VOC for Kalia!) spar urethane, which is supposed to be good for interior and exterior wood finishes (most polyurethanes say interior use only), and sanded with 220 grit sandpaper in between each coat.  Holy.forever.

We really were hoping that I didn't go into labor during all of this too.  If I would've, there would've been boxes blocking the front door instead of hardware because we took all of the hardware back off to do the finishing work.  We had a good chuckle on Sunday night, after the hardware was put back on, about our parents being at the hospital and asking for the keys to our house to go check on Kodi.  We could just see us telling them "oh, no need...just move the boxes and walk right on in.  Hopefully everything is still there!"

This week we fixed the broken tile from out front (it's still not 100% done, we need to re-grout it back in!), painted around the inside frame (the new frame is a little more narrow, so things aren't just a quick and easy replace...booo!), re-installed the trim on the inside, and added in the fill trim to account for the size difference.  We still need to go back and add more caulk around the frames, paint the frames, and maybe give the walls one more coat, but this is good enough for now.  I just wanted the framing at least on the doors in case Kalia decides to show up soon (please oh please!!!).  After all that...here's the result of our hard work!!


We need to find a new runner to put in front of this door too, but for now, we're working with what we've got!


Onto the outside...


On our to-do list is repaint the rest of the house (we did just the back when we were re-doing the pool deck), but that is certainty not something I'm wanting to tackle this weekend, at 39 weeks pregnant!


And here's the full Monty entry-way.


So what do you guys think?!  Do you think we're a little crazy to be doing stuff like this with two weeks left till my due date?!  I keep saying I'm ready, but now I'm REALLY ready!!  I'm so happy with the way these doors came out, and I'm SO THANKFUL for our privacy!!

I might or might not have stopped in front of the door and sang out "I'm in my skivvies, yeah, I'm in my skivvies!!!" while doing some retarded looking form of a dance that's only acceptable for my hubs to see at 38 weeks pregnant.  I could be making that up though.  You wouldn't know, even if you lived in my neighborhood, because you can't see in anymore!!!  Hallelujah!!

Whew...what a long post!!  Congratulations if you made it to the end...

Happy Friday everyone!!  Can you guys do me a favor and please get your 'labor dance' on for me...this Florida heat is getting to be too much, and I'm a-ready for Kalia to get here.

Hope you guys have a great weekend!
If you enjoyed this post, please leave a comment or subscribe to the feed reader to get future posts delivered to your reader.


I'm linking up to the parties in my sidebar...go check out everyone else's long-winded projects!
Related Posts with Thumbnails