
I'm so happy to say, Kalia's dresser is finally finished! It took us a few solid weekends to build it, and it took lots of days and nights in the garage to get it finished paint wise, but it's done! Painting was about a billion step process...so get ready for an overloaded picture post!
First up, we taped and primed the dresser and the drawers. We used Kilz water based primer...I don't really prefer this over other primers in general, but I need to use water based because of Kalia, so it gets the job done.


Next up, we painted the dresser with two coats of the same blue from Kalia's closet. I think this picture is just the first coat, so just picture the second coat with a little bit deeper of a color!

Here's where the fun part came in, and Chris exited stage right. Well, here's where the creative part came in anyways! I didn't exactly know what I wanted the finished product of this to look like. I wanted to tie in all of the exisiting pieces in Kalia's nursery...the crib, the daybed, the alphabet wall, the bookshelves, and her closet system.
First I attempted to dry brush on some grey paint and followed that up with more dry brushing of a mix of white and the same blue that her dresser is painted, and distressed the edges of the drawers.

It wasn't bad, but it wasn't the look I was going for. And replicating this on the entire dresser was going to be a pain in my rear.
Next, I painted over a different drawer front with the grey color from her walls...

And then when that dried, I sanded both drawer faces down to see if I liked either one of those looks. I didn't worry about getting an even coat of the grey above because I knew I planned on sanding to allow the blue to show back through.
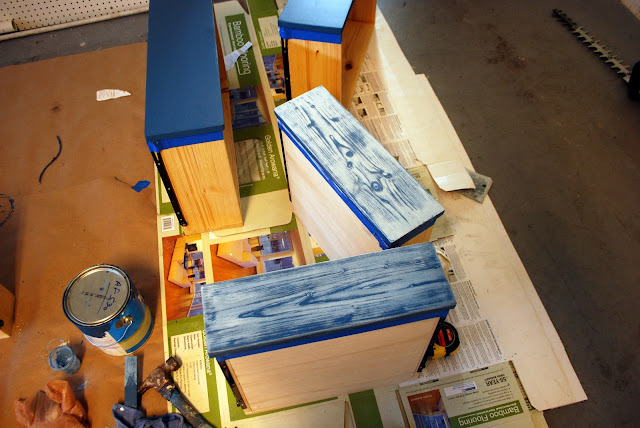
Hmph. Both of these are sort of cool in their own rights, but still not the look I was going for. Third time was a charm though! I decided I wanted something a bit more subtle, but that still added depth and dimension to the piece, so I mixed up a 'white wash' (really a grey/blue wash) of 8 parts water, 3/4 parts grey and 1/4 part blue.

I didn't worry too much about the paint brush getting fully dry. I made sure I wasn't slopping water around everywhere, and then wiped this on the drawer front.

Then I took a soft rag and wiped off the excess in the direction of the wood.

To end up with this :

Which I finally liked! After I repainted over my other two experiment drawers with the blue again, I applied this white wash to all of the drawers and the entire dresser. I actually had to have Chris do the white wash to the bottom shelf because I couldn't handle squatting or lying down with my new large and in charge body I'm carrying around these days. I tried to just roll with whatever outcome happened...worst case, we can go back and refinish this dresser later!
Next up, I wanted to add glaze. I wanted sort of a modern vintage feel, and I debated about going back and taking my sander to the edges of everything, but decided since we had done such a nice job at avoiding drips and painting those edges, I'd just add the glaze for now, and perhaps go back and distress later. You know, in case I'm bored and need something else to do ... ha!
I added glaze to the entire drawer, and wiped off the glaze from the front, but left the glaze concentrated around the edges.

I wanted to leave a thick glaze border around the edges, but didn't want a clean line of glaze, so I used an old tee-shirt, and pushed the glaze to the edges of the drawer fronts until I had something I was happy with.

The glazing was the biggest pain in the rear part of this whole project. I know this look isn't for everyone, but it definitely gave me the look I was going for. I did this for all five drawer faces...here's the three small ones finished :

I feel like the glaze makes the blue pop against it. After these were done, I glazed around the edges of the entire dresser. Holy lots of work!! Chris had to do the bottom shelf again, so he's learned a bit of painting technique. I think he's on par with building, but his patience hasn't quite mastered the finishing work just yet!
At this point I stopped taking step by step pictures. We had to move the dresser indoors because the AC people needed the garage, and I was just so ready to get this thing DONE! We painted three coats of polycrilic on the top of the dresser and the drawer faces, and everywhere else got two coats. I sanded with 220 grit sandpaper inbetween each coat.
On Saturday night, we installed the handles on the dresser, and I can't explain how happy I was to finally move the finished product into Kalia's nursery!
Ready to see how it turned out?!

TADA!!!!
Pottery Barn had sent me a $25 off $50 coupon, so I ordered three different sets of handles, but decided these ones tied in best with her room. They give the straight lined dresser a little bit more of a feminine feel and tie in nicely with her crib.

I also like that they fit the 'feel' of the dresser and compliment the glazing really well.

I added two of the baskets that I had gotten from my baby shower to the bottom of the dresser, and then put up these two picture frames I picked up a little while back from Z-Gallerie. I'll put pictures in there before too long.

The diapers in the basket on the right are from the diaper cake I also received at my baby shower. Diaper cakes are so fun as decoration, but man oh man, unrolling a million newborn sized diapers sure is a lot of work!

And here's how the the dresser ties in with the crib :

Here's how it ties in with the daybed and alphabet wall :

And here's an attempted shot at how the three tie in together. It's not the best, but you get the idea!

Next up for the nursery...adding wall decor above this dresser! Hopefully I can work on most of that project without causing too much stress on my back. I started my 8 month of pregnancy today...time is a tickin'!
So what do you think? Do you like the final outcome of the dresser?! Every time we walk into her room, we love it more and more. This nursery sure has been a labor of love!
One reminder ... here's where we started with this wall :

Whew! I'm exhausted just looking at how far we've come!
Hope everyone had a great weekend! Happy Monday!
To see all things nursery related, click here. To see the paint colors I used, click here and scroll to the bottom.

If you enjoyed this post, please leave a comment or subscribe to the feed reader to get future posts delivered to your reader. First up, we taped and primed the dresser and the drawers. We used Kilz water based primer...I don't really prefer this over other primers in general, but I need to use water based because of Kalia, so it gets the job done.


Next up, we painted the dresser with two coats of the same blue from Kalia's closet. I think this picture is just the first coat, so just picture the second coat with a little bit deeper of a color!

Here's where the fun part came in, and Chris exited stage right. Well, here's where the creative part came in anyways! I didn't exactly know what I wanted the finished product of this to look like. I wanted to tie in all of the exisiting pieces in Kalia's nursery...the crib, the daybed, the alphabet wall, the bookshelves, and her closet system.
First I attempted to dry brush on some grey paint and followed that up with more dry brushing of a mix of white and the same blue that her dresser is painted, and distressed the edges of the drawers.

It wasn't bad, but it wasn't the look I was going for. And replicating this on the entire dresser was going to be a pain in my rear.
Next, I painted over a different drawer front with the grey color from her walls...

And then when that dried, I sanded both drawer faces down to see if I liked either one of those looks. I didn't worry about getting an even coat of the grey above because I knew I planned on sanding to allow the blue to show back through.

Hmph. Both of these are sort of cool in their own rights, but still not the look I was going for. Third time was a charm though! I decided I wanted something a bit more subtle, but that still added depth and dimension to the piece, so I mixed up a 'white wash' (really a grey/blue wash) of 8 parts water, 3/4 parts grey and 1/4 part blue.

I didn't worry too much about the paint brush getting fully dry. I made sure I wasn't slopping water around everywhere, and then wiped this on the drawer front.

Then I took a soft rag and wiped off the excess in the direction of the wood.

To end up with this :

Which I finally liked! After I repainted over my other two experiment drawers with the blue again, I applied this white wash to all of the drawers and the entire dresser. I actually had to have Chris do the white wash to the bottom shelf because I couldn't handle squatting or lying down with my new large and in charge body I'm carrying around these days. I tried to just roll with whatever outcome happened...worst case, we can go back and refinish this dresser later!
Next up, I wanted to add glaze. I wanted sort of a modern vintage feel, and I debated about going back and taking my sander to the edges of everything, but decided since we had done such a nice job at avoiding drips and painting those edges, I'd just add the glaze for now, and perhaps go back and distress later. You know, in case I'm bored and need something else to do ... ha!
I added glaze to the entire drawer, and wiped off the glaze from the front, but left the glaze concentrated around the edges.

I wanted to leave a thick glaze border around the edges, but didn't want a clean line of glaze, so I used an old tee-shirt, and pushed the glaze to the edges of the drawer fronts until I had something I was happy with.

The glazing was the biggest pain in the rear part of this whole project. I know this look isn't for everyone, but it definitely gave me the look I was going for. I did this for all five drawer faces...here's the three small ones finished :

I feel like the glaze makes the blue pop against it. After these were done, I glazed around the edges of the entire dresser. Holy lots of work!! Chris had to do the bottom shelf again, so he's learned a bit of painting technique. I think he's on par with building, but his patience hasn't quite mastered the finishing work just yet!
At this point I stopped taking step by step pictures. We had to move the dresser indoors because the AC people needed the garage, and I was just so ready to get this thing DONE! We painted three coats of polycrilic on the top of the dresser and the drawer faces, and everywhere else got two coats. I sanded with 220 grit sandpaper inbetween each coat.
On Saturday night, we installed the handles on the dresser, and I can't explain how happy I was to finally move the finished product into Kalia's nursery!
Ready to see how it turned out?!

TADA!!!!
Pottery Barn had sent me a $25 off $50 coupon, so I ordered three different sets of handles, but decided these ones tied in best with her room. They give the straight lined dresser a little bit more of a feminine feel and tie in nicely with her crib.

I also like that they fit the 'feel' of the dresser and compliment the glazing really well.

I added two of the baskets that I had gotten from my baby shower to the bottom of the dresser, and then put up these two picture frames I picked up a little while back from Z-Gallerie. I'll put pictures in there before too long.

The diapers in the basket on the right are from the diaper cake I also received at my baby shower. Diaper cakes are so fun as decoration, but man oh man, unrolling a million newborn sized diapers sure is a lot of work!
Here's the view when you first walk in Kalia's room:

And here's how the the dresser ties in with the crib :

Here's how it ties in with the daybed and alphabet wall :

And here's an attempted shot at how the three tie in together. It's not the best, but you get the idea!

Next up for the nursery...adding wall decor above this dresser! Hopefully I can work on most of that project without causing too much stress on my back. I started my 8 month of pregnancy today...time is a tickin'!
So what do you think? Do you like the final outcome of the dresser?! Every time we walk into her room, we love it more and more. This nursery sure has been a labor of love!
One reminder ... here's where we started with this wall :

Whew! I'm exhausted just looking at how far we've come!
Hope everyone had a great weekend! Happy Monday!
To see all things nursery related, click here. To see the paint colors I used, click here and scroll to the bottom.

I'm linking up to the parties on my sidebar!
The dresser is gorgeous! I am so jealous you got a PB coupon. I've been on their mailing list forever & I never get coupons. I love how the nursery is turning out & that crib is just to die for.
ReplyDeletelove the brown on the dresser, and it IS perfect with those handles!
ReplyDeleteOoooo super snazzy!
ReplyDeleteHer baby room is turning out amazing! I love that it is feminine but not overly girly! it's something she can grow with vs. something she will quickly grow out of.
ReplyDeleteWow - I love the way the dresser turned out! I wasn't sure until I saw the finished product all put together, but its gorgeous! Those handles really tie in well, too.
ReplyDeleteBeautiful!!! Absolutely *love* it :)
ReplyDeleteHave to agree with Kristy...wasn't sure I'd like it and then it was all put together and the hardware made the whole piece come together. Love it! Love you! You need to start taking it easier now young lady ;-) That's sister's orders!
ReplyDeleteLove the dresser. What brand/color glaze do you use? Thanks, Lisa
ReplyDeletewow! it's a great dresser! Isn't it amazing why we paint on and paint "off". LOL
ReplyDeletegreat job!
gail
Thanks ladies! :-D
ReplyDeleteStephanie - I only get coupons, I think, because I've got a credit card through them. I get them two to three times a year, definitely lucky!
Kristy and Jenn - um, yeah...me too!! I kept having to remind myself that sometimes it looks worse before it looks better and I had to trust my 'final vision' I had that I was going with! Kinda scary though.
Lisa - I use Ralph Laurens Glaze tinted in Smoke from Home Depot. Hope that helps!
Hey Kara! Thanks so much for visiting me! hehe. So I came over to snoop around your site of course. I am so happy with what I found here - what a great blog! This dresser is so great! I totally agree with you about the first two techniques, the third was the charmer for sure. I love how the glazing makes it extra special and pairs so well with the hardware. Nicely done!
ReplyDelete~ www.billiemonster.com ~
Love it! I have two dressers that I need to do something with. Great idea!
ReplyDeletecrazy that you are already 8 months!! i feel like you just got back from hawaii and announced you were pregnant. we need a belly shot in one of these pics! :)
ReplyDeletevery pretty. I love the colors and the drawers turned out awesome!
ReplyDeletemegan
craftycpa.blogspot.com
Wow, it looks like you guys did a great job! Everything looks so good in that room! Thanks for sharing the "how to's."
ReplyDeletelucyluvinyl.blogspot.com
I absolutely LOVE the dresser! Your hard work was well worth it. I am in the middle of creating "big boy" room for my 2 1/2 year old. The last piece is the dresser. You are inspiring me!
ReplyDeletewww.kim-toomuchtimeonmyhands.blogspot.com
Very nice! What a great piece of furniture! =)
ReplyDeleteWow....love it! I also love that crib!My simple home life
ReplyDeleteThis looks great. Would love for you to link it to my Delightfully Inspiring Thursday Party.
ReplyDeletehttp://delightfulorder.blogspot.com/2011/04/delightfully-inspiring-thursday-party-6.html
DaNita
Wow! I love it! And I love the alphabet wall, too--so cool! I wish my room was that cute ;-)
ReplyDeleteRachel @ Maybe Matilda
Very nice! Visiting from HOH. Come visit me sometime!
ReplyDeletehttp://superstinkyboys.blogspot.com
xoxo
Ginger
I LOVE how it turned out! Congrats, BTW!! all the work on the drawer faces was totally worth it because they look amazing!
ReplyDeleteThe dresser looks lovely, great choice of hardware too.Hoping your weekend is a happy one. Hugs, Katherine
ReplyDeleteKara,
ReplyDeleteWow! That looks great! I love the look the glazing added, it really made the piece. Way to keep at it, even while pregnant! :)
Great job on the dresser - the colour is so pretty too!
ReplyDeleteBeautiful, love the blue! I am working on a dresser today--can't decide what color?? Thanks so much to linking up to Beyond The Picket Fence.
ReplyDeleteYou did a fantastic job. THanks for sharing all the steps. Love your blog and I'm your newest follower.
ReplyDeleteStop by for a visit sometime.
xoxo,
Kim
that is utterly amazing! i love the finish, color, style of the dresser... it looks straight out of pb kids, but ten billion times better!
ReplyDeleteLove the dresser in that color. Love the handles too. The nursery is really beautiful. Well done!
ReplyDeleteI know I'm a little late on catching up with the blog, but wow, I just love how the dresser turned out! And the handles were absolutely the perfect touch!!
ReplyDeleteYou've been featured at my Hookin Up With HoH Party this week!
ReplyDeletePlease feel free to stop by and grab a button if you'd like!
Thanks,
Allison @ House of Hepworths