Showing posts with label exterior house. Show all posts

Friday, June 15, 2012

Exterior Fountain Makeover AND a Krylon promotion

I know, I know, I disappeared again.  That's because I'm now officially a Mom to a one year old, and I had about a million projects I wanted to get done before her first birthday party!  That year most definitely flew by.  I think I blinked a few times and then it was over.  Pictures of the party and projects coming soon, I promise!

One of the things that's been on my to-do list for forever has been that fountain / bird bath that sits outside the front of our nicely painted home.


It's dingy looking and I'm not sure if you can tell in the picture or not, but the undertones in it are pink.  Just like the pool deck and the front entry way used to be.  Call me crazy, but I'm just not really a pink kinda gal.

I took the easy way out, initially, with redoing this fountain.  I took my favorite Ocean Breeze spray paint from Krylon and went to town on it.  I like blue and all, but this turned out entirely too blue for what I was going for.


That's okay though, I had a backup plan.  I thought it might be a bit much with the bright bright blue and the old kind of feel of the fountain, so I added glaze to it to add back in that rustic / old vibe it was supposed to have.  After waiting 10 minutes for the spray paint to dry, I smothered the entire thing in glaze.


And then just wiped it off.


Doing this piece by piece was really a lot of work.  I kept stacking them up to make sure I still liked the end product before proceeding with the next one.


Look how much difference the glaze vs. non glazed section looks like on here :


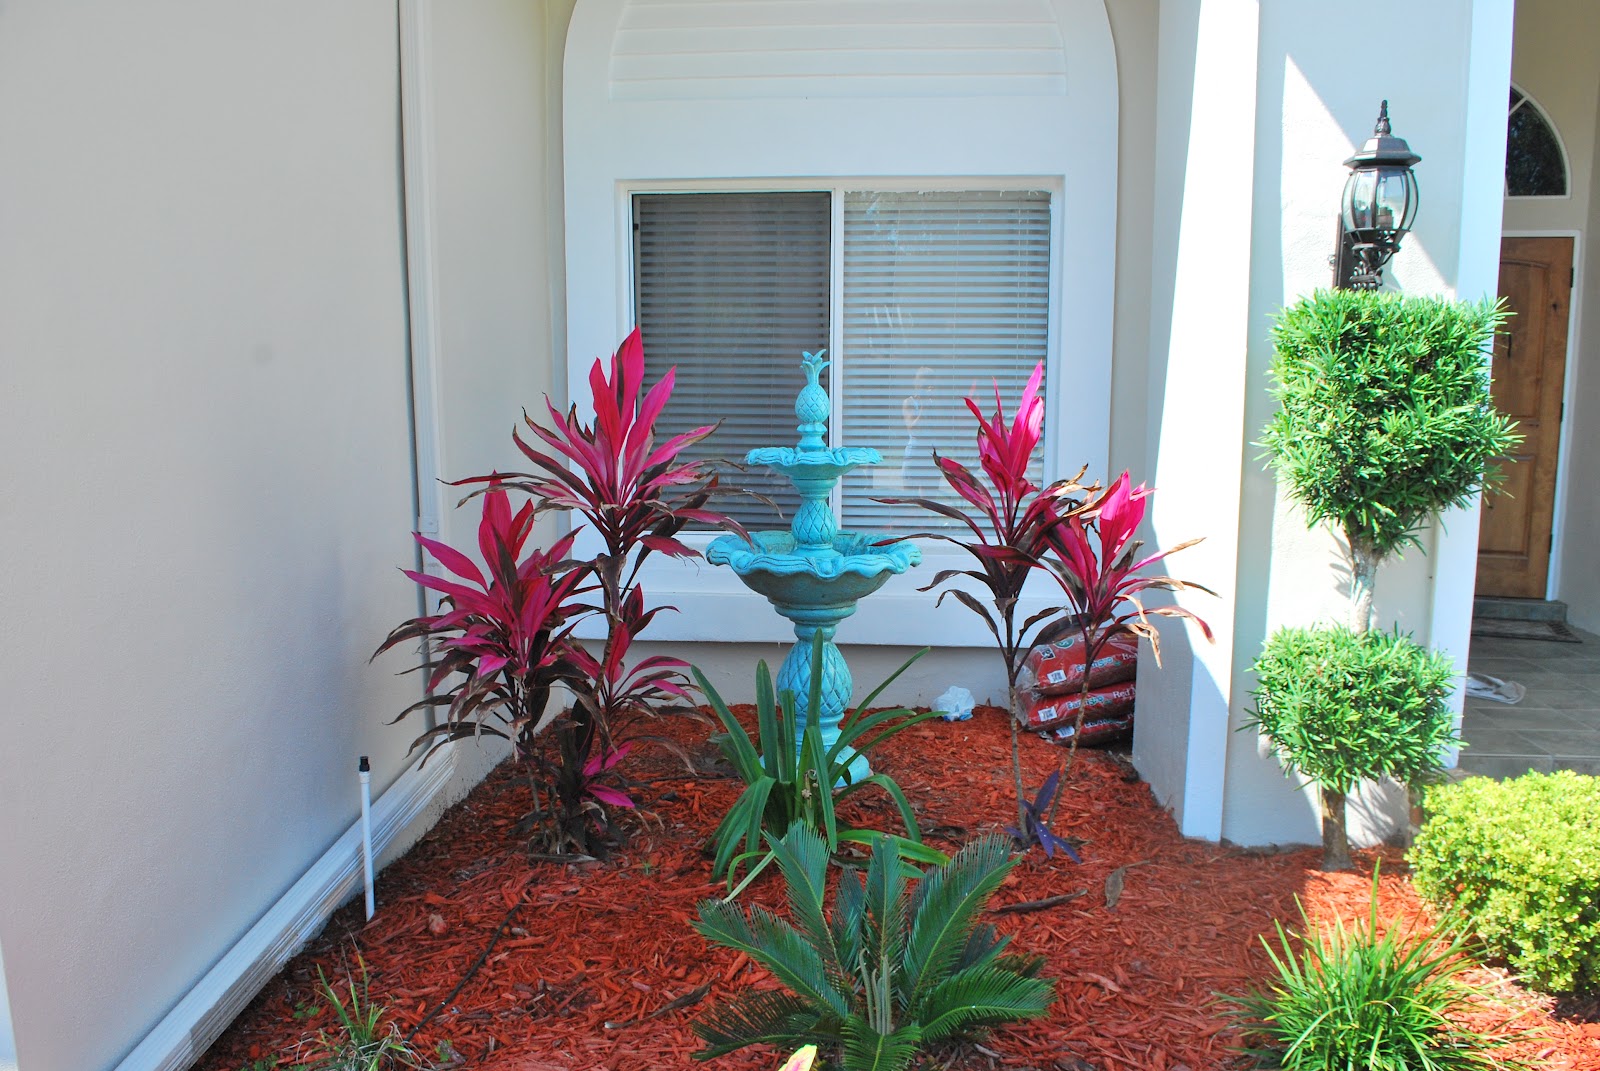
And finally, after quite a few naptimes and getting eaten up by mosquitoes after bedtimes, I was left with this :


We coated it with polycrylic hoping that it'd keep a little bit longer in the weather, although the Krylon spray I used is indoor / outdoor.  I'm not worried about the spray paint, moreso the glaze.  I used the ocean breeze on the exterior lights in the back well over a year and a half ago, and they've held up to the Florida weather just fine.


I really like the look of it against the red colored plants in the front.  I'm sure they have a formal name, I just have no idea what it is!


I also like how the fountain color ties in with our ceiling color.  As a side note, I think we hung the pendant in our entry way too high.  Good thing Chris didn't clip the extra wire.  He does want to shoot me though for realizing this after he thought we were done with that project.  Oops!

Now onto the fun part ...the promotion!  If you live in the Tampa Bay area and would like the opportunity to win a $2500 Lowe's shopping spree, listen up!  All you have to do to win is visit one of the 15 participating area Lowe's (see more info here : http://www.krylonatlowes.com/), take a picture with your smartphone of you in front of the Krylon display, and text your photo to 80202.  That's it!  You can only enter once and the promotion runs through June 23rd.  Every day two winners will receive a $25 gift card as well, so the sooner you enter, the better!

For those of you that know me personally, no, I didn't get a smart phone, and no, I didn't get text messaging.  So, that's one more chance for you to win because I'm still in the dinosaur era and can't enter.  Boo!  One day I'll upgrade, one day!

So what do you guys think of my fountain redo?  Too bold or out there for you?  Anyone else have anything out of the ordinary color wise greeting passer by's?

Hope everyone has a wonderful Father's Day weekend, and if you're swinging by Lowe's to pick something up for your Dad, don't forget to enter the Krylon promotion!

If you enjoyed this post, please leave a comment or subscribe to the feed reader to get future posts delivered to your reader.


*As a full disclosure, Krylon contacted me asking me to post about their promotion.  In return, I received three cans of their spray paint.

Friday, May 4, 2012

You Light My World

Moving along in finishing up our outside projects, we got our pendant for our entry way and installed it this week.  Yay for light!

When we were looking for pendants we wanted something unique that wasn't too over the top, especially in the price arena.  I saw some of the most amazing outdoor lights, but when it comes down to it, we just weren't willing to spend the big bucks on something that hangs outside.  It's crazy how expensive those things are!

And then the latest Pottery Barn magazine showed up, and it had their Moroccan Pendant, and I was sold!  They had just sent me a 15% off coupon for PBKids, so I called and asked if they'd apply to to a PB order.  The lady said no, but that she could give me 10% off, and they were running a free shipping promo too...score!  Love it when everything works out like that!

First up, we wanted to make sure everything worked before installing it.  Of course, being Kara and Chris, we had a casualty.


Actually, after Chris dropped the light bulb and it shattered into a million pieces, he said "Call me TJ".  My Dad's name is Tom, and TJ stands for Tom Junior around these parts.  I can say I come by my clumsiness (and also knack for DIYing house projects to be fair) from my Dad.  Apparently spending a weekend with him rubbed off on Chris.  Love you Dad!!  :-)

The pendant came with a 12 foot long cord.  Where in the world do you use a 12 foot long cord to hang a pendant?  It looked like a tether ball instead of a pendant!


We took out the chain links and then wrapped the wires up in the top of the ceiling.  Our 8 foot ladder wasn't quite tall enough to reach though, so we did the completely safe thing and put concrete pavers up underneath the ladder to elevate it some.


I don't recommend doing this for anyone else.  It's definitely not safe.  I like my life, apparently Chris goes back and forth on his :-).

When it was all said and done, we got exactly what we were looking for.  I love the way the light plays off the cover of the pendant.


It reflects perfectly on our blue ceiling, and we've gotten tons of compliments by neighbors already.

Chris initially thought it was too small, but most pendants are pretty small.  We got the 12 inch one instead of the 8 inch one.  What do you think?  Do you like the new look of it?  It's much better than the gaping hole or rusted goldish thing that was there before, that's for sure!


Next up for the 'finishing it off' task in the front is getting that fountain re-painted!

Hope everyone has a wonderful weekend!  We've got family in town through next weekend, so postings will probably be scarce next week.  Happy Friday!!

If you enjoyed this post, please leave a comment or subscribe to the feed reader to get future posts delivered to your reader.

Wednesday, April 25, 2012

Painting the House Part 3 : The Front

I would love to have titled this Painting the House Part 3 : The End, but we still haven't finished painting.  We just haven't finished the final side that is pretty close to our neighbors house.  You can barely see it when you turn the corner, and painting with a new baby is quite challenging.

When we first moved into this house (April of '09), I wasn't blogging.  I don't have a great before picture of where we started, but I did find the listing agents picture from when we bought the house.  This picture is actually a lot nicer than what we really moved into.  After we went under contract, they stopped watering the yard or pulling the weeds, so everything that was supposed to be green was dead, and everything that was supposed to be dead (weeds) were over grown.  
We installed a 400 linear foot fence around our yard that very first week we moved in, and very shortly after that did some landscaping to the front, to wind up with this :


The new landscaping made our front yard feel so much bigger and less cluttered.  The paint color wasn't bad, but it kind of felt like a dull concrete color, and I knew we could brighten it up.  It also wasn't the best paint job - you could tell they only did one coat instead of two.  And the previous color that they covered up was pink.  Just like the pool deck before we redid it.  I think one of the previous owners thought she lived in a Barbie house.  ("I'm a Barbie girl, in a Barbie world" just got stuck in my head!)

Anywho, painting this big of a house with Kalia was a bit of a challenge, but we still managed to get it done.  It just took a little bit longer than most things.  We also had a friend come over and help (thanks Chris!), which was amazing.  Chris did most of the big stuff, and I did most of the trimming during Kalia's naptimes.  If she woke up while we were painting, she happily laid under those palm trees and kicked around.


Thank goodness we tackled painting the front before she got mobile...no way would she do that now!

And after so much work, here's what the front of our house looks like today :


Ignore the spray paint and the not so healthy grass.  Of course when I went to go take pictures of this, the cable company had to do work right across the front of our home.  I wasn't waiting to take pictures again!


From the landscaping, to the new doors, house numbers, lighting, and finally the paint, we're both really proud of how much work we've done, and how much better it looks!


Oh, and did you notice the blue ceiling in the entryway?  We really love the blue ceiling that we painted out on the pool deck when we started this whole house painting project forever ago, and decided to carry it through to the front.  And yes, the pendant is missing.  We finally found one that we both really like and won't break the bank this week, so I just need to order it.  Don't worry though, I'll be sure to update you guys when it comes in and we install it!


Minus the pendant, the one remaining thing out here that drives me bonkers is that fountain.  It is getting redone, hopefully sooner rather than later!


For those of you curious about the details, we used Behr's Exterior Paint in Satin.  The house color is Sandstone Cove, the trim is just their basic Ultra White, the garage doors are Harvest Brown, and the ceiling is Tide Pools.  Home Depot runs promotions on a regular basis of $20 off the big 5 gallon buckets, so we snagged up enough paint to do the entire house on one of those sales.

So what do you think of our new bright exterior?  So much work, but so worth it!

Hope everyone is having a great week so far - Happy Wednesday!
If you enjoyed this post, please leave a comment or subscribe to the feed reader to get future posts delivered to your reader.


I'm linking up to the parties on my sidebar, go check out more before and after's!

Monday, April 23, 2012

Painting the House Part 2 : Lighting

First off, thank you guys so much for your kind words about Kalia and my previous post.  It's so nice to be welcomed back into the blogging world with open arms!  Your kind words really do mean the world to me.

As promised, here's a project post!

When we got to the front of repainting the house, we knew we needed to do something about the sconces.  (As a side note, I had to google that to not call them scones.  Apparently my subconscious is really craving a pastry right now!)  They were the original builder grade ones and had paint chips and rust all over them.  In order to spray paint them, I knew we'd have to take all four of them completely apart, which I was definitely dreading.  So we did some searching for new ones to buy, and the cheapest ones that I only sort of liked were $50/piece.  Well, for $200, I could deal with the hassle and work with what we already had.  It's funny how the price savings can be a huge motivator!

Here's what we started off with :
Look at all that rust!!
We carefully took apart all four lights, sanded down the chipped paint parts, and wound up with about a million pieces to be spray painted.  The picture below is only close to half of everything that needed to be spray painted.
Because of all of the rust, and because we live in Florida where exterior things get pretty beat up on, I went ahead and sprayed these with both a primer and then the actual color, which was a paint and primer in one.  I have no desire to ever take these lights apart again to redo this project!  Here's what I used :
I also think the primer is cheaper than the paint color, and I only needed two light coats of the actual oil rubbed bronze.  There was a garage sale in our neighborhood when I was working on these, and we had several people stop by asking if the lights were for sale.  Too funny!  We've had numerous neighbors compliment us on our new lights too, and they're shocked to find out that we spray painted them.

The key, as with everything paint related, is to do really light coats.  Like so light that you're worried you're not getting enough coverage.  It dries really quickly and you can do another coat right on top to get the coverage you need.  My general rule with most things I spray paint is to never hold the trigger down for more than 5 seconds.  It's so easy to want to do a thick coat to just be done with it, but you'll regret it in the long run.  Trust me on this one!

Here's what they look like today :
and here's what it looks like with our house numbers that we added to the front almost a year ago (really, a year?!?  Is this how life is with babies?  Where did the time go?!).
Which is so much better than the ugly off white, rusted lights that were there previously, and they tie in so much better with our front door hardware too!
The pictures of the finished product give you a sneak peak at our finished paint job.  Stay tuned for that post!

So what do you think?  Worth the $200 in savings?  I actually started to tackle that fountain that has driven me bonkers since we moved in three years ago this weekend, but then the rain storms came in before I could get very far.  Hopefully I get to cross that one off the to-do list shortly too!

Hope everyone had a great weekend!  Happy Monday!
 
If you enjoyed this post, please leave a comment or subscribe to the feed reader to get future posts delivered to your reader.


I'm linking up to the parties in my sidebar - go checkout what everyone else is redoing!

Tuesday, November 15, 2011

Painting the House Part 1 : Stucco Tutorial

Last September, we started painting the exterior of the house.  Yep, I said started...we never got past the first 25%.  At the time, it made perfect sense.  We were having pavers installed for the pool deck and wanted to go ahead and get the back painted before installation.  Chris was in school, and I was in my first trimester of pregnancy.

For the past year, almost every day when we'd go for a walk or run, we'd laugh at how the back of our house was a different color than the rest of it.  We were busy working on the nursery, and then the whole having a baby thing left us with very little free time to paint this big 'ol house.

And then I found this :


Do you see all the cracking on the side?  And the rust coming through?  It was worse on the other side of the trim, but I couldn't wait to take a picture, we just started poking to see how bad the damage really was.

Taken  after we poked around some - it wasn't quite this bad to start off with!
It was bad.

And then Chris got out his side grinder and went to town.


Most sane people probably wouldn't have gotten that far, especially not with a 4 month old, but we're not sane sometimes.  We've done a little bit of stucco patch work, and neither one of us have been happy with the outcome.  This, obviously, needed more than just a patch job.

I gave Chris the green light to go ahead and see how bad the damage was, which meant he just keep breaking it apart until we got to good boards, by convincing him that we've needed to paint the house for some time now, so we'll just do the stucco work, and then repaint the entire house.

Logical, right?

Chris bought into it.  A few weeks later he questioned why he ever let me talk him into painting the entire house because of a little stucco trim work, but that's another post for another day.

Back to the stucco...

We decided we were going to google and utube "how to stucco", and then go to the big orange box store and have the guys there help us with getting supplies.  Then Kalia needed a nap, and to be fed, and a diaper change, and to be played with, and we realized that we might have bitten off a little more than we could chew.

So, we caved in and decided to get a few quotes.  If the quotes were reasonable, we'd pay someone to do it.  If they were absurd, we'd go back to plan 1, and just accept the fact that it was probably going to take us 10 times longer than normal to get it done.

First quote came in at $225.  We had a few other places we were going to have them repair too, so we thought that was pretty reasonable.  The second quote came in at $1500.  Wha???  We asked a buzillion questions and they both were using the same exact methodology.  Um, we'll take the $225 guy please.

We took pictures and asked lots of questions during the process, so that we'd know how to do stucco work if we ever needed to again.

Here's what the stucco guy was starting with.


And here's the how-to for any of you over-ambitious diy'ers out there!

First he cut back the rest of the old stucco work to make it nice and even.


Then he added the new trim boards (pressure treated wood) to fit.


Next, he took this piece of mesh and wire with paper backing :


And put it over top of the wood boards, securing it in with nails.


After that, he nailed in the protective vinyl edges.  The vinyl edges are an upgrade from what was previously there.  Most old houses used metal galvanized edging, which was why we had the rusting in the first place.  Well, that combined with the fact that the previous owners had the sprinklers spraying on the house.  We moved them out shortly after we moved in, but the damage was already done.  Water plus metal is no good!

Just an fyi, all of this stuff can be found at your local home improvement store.


To keep the edges secured, he added staples along with the nails.


We had another area that was starting to show some wear, so we decided to go with a quick patch approach on fixing it.  To do this, he needed to chip out some of the old stucco to give the new stucco something to stick to.  It's basically roughing up the surface like you would for most paint projects, but instead of sanding, he used a metal scraper.


This is what it looked like after he was done chipping it off.


To bond old stucco with new stucco, some type of liquid bonding agent is needed.  It kind of looks like Elmer's glue.  He applied this using a sponge to all of the areas where the new stucco would go on top of the old stucco.


That's just the prep work!

Next up, the mixing.  To create the sand finish to match the existing stucco work on the house, he mixed sand in with the stucco mix. He recommended not going too heavy on the sand to keep the final product strong.  The mix was approximately 50/50.  He mixed this dry in a large wheel barrow.


After dry mixing, he put the mix in buckets and added water.  To mix the stucco, sand, and water he used a drill with a stirring tool to make a very smooth final mix.


The actual stucco work itself is a lot like working with grout.

Just put the stucco on your trowel and spread.  He used a tray to hold the stucco, which seemed a lot easier than dipping the trowel into the bucket.  I'll have to remember that for future projects!


Then smooth it over the surface,


until your area is completely covered.


Finish by taking your soft sponge and gently wiping until you have a smooth surface.


And that's it!  It's definitely a lot of work, but at least we know it's do-able for the next go round.  The stucco guy even took off $25 for stepping on a plant (it'll come back), and for us giving him water.  What a guy!

Anyone out there willing to tackle stucco work on their own?    Make sure to stay tuned for more house painting projects.  It's quite a bit of work, but it's looking a-mazing!

Hope everyone's having a great week.  Happy Tuesday!

If you enjoyed this post, please leave a comment or subscribe to the feed reader to get future posts delivered to your reader.


I'm linking up to the parties on my sidebar.
Related Posts with Thumbnails