Allright, here's the tutorial I promised. I'm actually going to give you two tutorials in here. The first one is the way I did it, and the second one is the way you should do it. Trust me, they're not the same! (In case you missed it, click here to see the full post on the bathroom reveal with before and afters).
Before we get to the tutorial, the colors I used were :
FolkArt Acrylic Paint (Plaid series) in Metallic Pearl White, Metallic Blue Sapphire, Metallic Sequin Black, and Metallic Silver Sterling.
Allright...tutorial...
Step-by-step instructions on how I did it:
1. Tell the hubs your just going to paint the countertops after realizing a new large vanity would run us $1000. Tell him there's no way I could make it look much worse than it already is. Buy craft paint from Jo-Anns. Point : Kara. Win.

2. Put on trust ventaltor mask and paint one coat of Kilz oil-based primer over entire cabinet. Do not tape a thing because you've become a much neater painter over the past few months. Sit back and smile because it already looks a million times better!

3. Squeeze out a dollop of the black paint onto your 'art pallet' and apply first coat on vanity in random spots using a paper towel. Try not to make it look like a pattern.

4. Sit back and scratch your head when you realize it looks like you just painted a cow on the top of your countertops. Convince yourself that it always looks worse before it looks better.

5. Add in the metallic white base in a random pattern, making sure to not overlap the two colors too much, just occasionally. Try to convince yourself that the countertop really is starting to look better...like granite.

6. Add in the blue paint. Step back. Wowzer...things really aren't looking any better. It's okay though, you've got one more color to add on. Convince yourself that the next step will really make it look better. (Oh yes, and paint the cabinets China White by BM while you're at it...because you need to at least make something look better!)

7. Add in the gray metallic paint. Step back and realize that it looks like your countertops have leprosy or something.

8. Decide you need another color added in and that will start to make things look better. Mix your gray and black paint together to create a lighter black color and dab that all over the countertop.

9. Step back and look at that. Nope, not any better. Decide to add in more gray and more metallic white. Go crazy with it. Go look at kitchen granite, come back and splatter black in little dots around your countertop all while singing this to your poor countertops : "I'm not crazy, I'm just a little unwell. I know, right now you can't tell. But stay awhile and maybe then you'll see...A different side of me". (Your welcome for getting that song stuck in your head! Gotta love Matchbox 20!)

10. Step back again and look at it. Realize that doesn't look anything like granite and the countertops are indeed crazy and unwell. Not even close. Decide to get smart and google "how to paint faux granite countertops." Come across this blog and read what she did. Then go over to her video and watch what she did. Don't listen because your home computer doesn't have speakers installed yet (yes, I've lived here for two years...nope, I haven't gotten around to it yet!), just watch. Realize about 1 minute into the video that you didn't put on nearly enough for your 'base' coat.
11. Go back and add a lot of black on top of what's already there.

12. Step back and smile. Ahhh...finally...it's getting there!! Oh, and do not put gloves on. All of this :

Will wash off...and maybe some skin along with it...bonus! It's like ex-foliation for free!
13. Add blue back in. Remember worse before better!

14. Add gray back in.

15. Add metallic white back in.

16. Step back, think you like it, and go to bed.

17. Decide the next day it's too busy now...add more black back in and paint seams around sink base black.

18. Curse at yourself for not taping off the sink and spend entirely too much time scrapping paint off of it. Oh yes, and paint the cabinets Moonshine by Benjamin Moore. China White just wasn't cutting it.

19. Again curse at yourself for not taping, and then repaint along the backsplash of your countertops...because you're not a neat painter like you thought you were. Add that on top of the fact that its impossible to be 'neat' with blotting paper towels like a mad woman, and it's just a double whammy.

20. Add a buzillion coats of polycrylic in gloss, waiting 2 hours between each coat. (I really added 8 coats). Do this first thing when you wake up in your pj's, then run in there and do a quick coat at lunch time, and then after work, immediately add another coat so that you can go in every 2 hours till you go to bed and add just one more coat. Add second coat of Moonshine by BM to the cabinets. Step back and smile. You saved $990 by doing all of this yourself, even if it's not perfect. Give yourself a pat on the back for trying something new and vow to research how to do things before jumping in next time.


(Yes, I know...overload on pictures. This was a.lot of work...I have to show you a million finished product pictures!)
I'm letting it 'cure' for a buzillion weeks to make sure that the surface is pretty strong. Really, it'll probably cure until Kalia arrives and someone stays in the daybed room. Chris and I rarely use this bathroom right now, so it's no big deal to avoid using the countertops for the next several weeks.
Oh, and after I'm done letting it cure, I do plan on caulking around the sinks to give it a more seemed and finished look. I did scratch some of the paint by the sinks when I scraped it off, but my solution to this will be the caulk. I don't want to caulk it until after it's fully cured though.
Notes and things I'd do differently next time :
Minus the obvious of figuring out what the hey I was doing before starting, next time, I'd :
Step-by-step instructions on how you should paint your countertops.
1. Check your OCD at the door. If you want perfection, this isn't the project for you.
2. If you're 33+ weeks pregnant, go sit on the couch with some ice cream. Stop right here.
3. Otherwise, grab a glass of wine. I'm serious on this one. This project would've seemed a whole lot more sane if I had a little vino to go along with it. Water just wasn't cutting it!
4. Go over to this blog and watch the how-to video. You should probably listen to the video too, I'm assuming that would help.
5. Do whatever the video told you to do. Seriously. There's no way anyone else could make it any harder than I did. Her way has to be more simple.
.....
I still do love the way my turned out though! What do you think? Do you love or hate the faux granite look?!

If you enjoyed this post, please leave a comment or subscribe to the feed reader to get future posts delivered to your reader. Before we get to the tutorial, the colors I used were :
FolkArt Acrylic Paint (Plaid series) in Metallic Pearl White, Metallic Blue Sapphire, Metallic Sequin Black, and Metallic Silver Sterling.
Allright...tutorial...
Step-by-step instructions on how I did it:
1. Tell the hubs your just going to paint the countertops after realizing a new large vanity would run us $1000. Tell him there's no way I could make it look much worse than it already is. Buy craft paint from Jo-Anns. Point : Kara. Win.

2. Put on trust ventaltor mask and paint one coat of Kilz oil-based primer over entire cabinet. Do not tape a thing because you've become a much neater painter over the past few months. Sit back and smile because it already looks a million times better!

3. Squeeze out a dollop of the black paint onto your 'art pallet' and apply first coat on vanity in random spots using a paper towel. Try not to make it look like a pattern.

4. Sit back and scratch your head when you realize it looks like you just painted a cow on the top of your countertops. Convince yourself that it always looks worse before it looks better.

5. Add in the metallic white base in a random pattern, making sure to not overlap the two colors too much, just occasionally. Try to convince yourself that the countertop really is starting to look better...like granite.

6. Add in the blue paint. Step back. Wowzer...things really aren't looking any better. It's okay though, you've got one more color to add on. Convince yourself that the next step will really make it look better. (Oh yes, and paint the cabinets China White by BM while you're at it...because you need to at least make something look better!)

7. Add in the gray metallic paint. Step back and realize that it looks like your countertops have leprosy or something.

8. Decide you need another color added in and that will start to make things look better. Mix your gray and black paint together to create a lighter black color and dab that all over the countertop.

9. Step back and look at that. Nope, not any better. Decide to add in more gray and more metallic white. Go crazy with it. Go look at kitchen granite, come back and splatter black in little dots around your countertop all while singing this to your poor countertops : "I'm not crazy, I'm just a little unwell. I know, right now you can't tell. But stay awhile and maybe then you'll see...A different side of me". (Your welcome for getting that song stuck in your head! Gotta love Matchbox 20!)

10. Step back again and look at it. Realize that doesn't look anything like granite and the countertops are indeed crazy and unwell. Not even close. Decide to get smart and google "how to paint faux granite countertops." Come across this blog and read what she did. Then go over to her video and watch what she did. Don't listen because your home computer doesn't have speakers installed yet (yes, I've lived here for two years...nope, I haven't gotten around to it yet!), just watch. Realize about 1 minute into the video that you didn't put on nearly enough for your 'base' coat.
11. Go back and add a lot of black on top of what's already there.

12. Step back and smile. Ahhh...finally...it's getting there!! Oh, and do not put gloves on. All of this :

Will wash off...and maybe some skin along with it...bonus! It's like ex-foliation for free!
13. Add blue back in. Remember worse before better!

14. Add gray back in.

15. Add metallic white back in.


17. Decide the next day it's too busy now...add more black back in and paint seams around sink base black.

18. Curse at yourself for not taping off the sink and spend entirely too much time scrapping paint off of it. Oh yes, and paint the cabinets Moonshine by Benjamin Moore. China White just wasn't cutting it.

19. Again curse at yourself for not taping, and then repaint along the backsplash of your countertops...because you're not a neat painter like you thought you were. Add that on top of the fact that its impossible to be 'neat' with blotting paper towels like a mad woman, and it's just a double whammy.

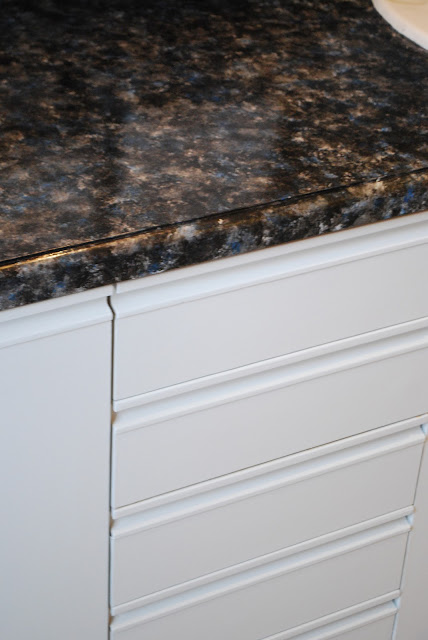
20. Add a buzillion coats of polycrylic in gloss, waiting 2 hours between each coat. (I really added 8 coats). Do this first thing when you wake up in your pj's, then run in there and do a quick coat at lunch time, and then after work, immediately add another coat so that you can go in every 2 hours till you go to bed and add just one more coat. Add second coat of Moonshine by BM to the cabinets. Step back and smile. You saved $990 by doing all of this yourself, even if it's not perfect. Give yourself a pat on the back for trying something new and vow to research how to do things before jumping in next time.


(Yes, I know...overload on pictures. This was a.lot of work...I have to show you a million finished product pictures!)
I'm letting it 'cure' for a buzillion weeks to make sure that the surface is pretty strong. Really, it'll probably cure until Kalia arrives and someone stays in the daybed room. Chris and I rarely use this bathroom right now, so it's no big deal to avoid using the countertops for the next several weeks.
Oh, and after I'm done letting it cure, I do plan on caulking around the sinks to give it a more seemed and finished look. I did scratch some of the paint by the sinks when I scraped it off, but my solution to this will be the caulk. I don't want to caulk it until after it's fully cured though.
Notes and things I'd do differently next time :
Minus the obvious of figuring out what the hey I was doing before starting, next time, I'd :
- Use two coats of primer instead of one. Definitely use oil based primer for this one though!
- Make sure that my primer coat is smooth and even and there's not any brush strokes showing through.
- Use a foam brush for both the primer and sealer coats. I initially used a paint brush and when you get in close, you can actually still see lines around the sink area. I'd probably sand between my layers of primer and then just go for it with the foam brush for the polycrylic.
- Paint the seams with black (or whatever my base color is) and around the sink first. That way I can add layers on top of it as I went along instead of worrying about my line being too thick.
- Most definitely tape and wear gloves. Nothing about missing those two things was fun!!
Step-by-step instructions on how you should paint your countertops.
1. Check your OCD at the door. If you want perfection, this isn't the project for you.
2. If you're 33+ weeks pregnant, go sit on the couch with some ice cream. Stop right here.
3. Otherwise, grab a glass of wine. I'm serious on this one. This project would've seemed a whole lot more sane if I had a little vino to go along with it. Water just wasn't cutting it!
4. Go over to this blog and watch the how-to video. You should probably listen to the video too, I'm assuming that would help.
5. Do whatever the video told you to do. Seriously. There's no way anyone else could make it any harder than I did. Her way has to be more simple.
.....
I still do love the way my turned out though! What do you think? Do you love or hate the faux granite look?!

I'm linking up to the parties on my sidebar...go see what else you can learn from others mistakes!!