Friday, March 11, 2011

Fun Family Cuteness

I lied, you get a Friday post too!  One of my sisters has been here most of this week for one of my nieces (Ashlyn) to have surgery.  We're so glad that we could visit with them, even if the circumstances were less than ideal.  My other niece (Kaylyn) made a card for Kalia, and sent it over with my sister.  I have to share it, it's too cute!  Kaylyn's been asking Chris and I for quite some time when we were going to have kids.  She's eight.

Here's her card she drew for Kalia :

Front (yes, she made her card backwards...adds to the cuteness factor!!) :


I'm pretty sure they were unsure how to spell Kalia's name initially...and since I'm notorious for not answering my phone, hehe, Kaylyn just used a K.


How cute is this?!?!  I'm pretty sure Kaylyn got confused on adding her sister Ashlyn...so she scribbled her out.  Because Ashlyn isn't Kaylyn's cousin, it's her sister...and this drawing is for cousins.

Did you see the cutest part?!  Here...I'll zoom in for you...


Kaylyn drew herself holding Kalia.  How cute is that?!?


I love that even my nieces are excited for Kalia's arrival!

Hope everyone's having a great Friday and has a great weekend!  More nursery projects are taking place here...hopefully I've got something done to show you guys on Monday!
If you enjoyed this post, please leave a comment or subscribe to the feed reader to get future posts delivered to your reader.

Wednesday, March 9, 2011

Pillow Talk - Nursery

The elephant towel I got (from Anthropologie, fyi!) while out on my nursery loot shopping trip with Erin has been my inspiration / color pallet for the entire room.  My plan when buying it was to turn it into a pillow.


So, that's exactly what I did.  I took a brown napkin I had left over from my napkin pillows with fabri tac project in the daybed room, and sewed it onto the back of this tea towel.


And here's the front :


My tea towel was a little longer than my napkin, so I just sewed along the napkin hem, and cut off the excess fabric that hung over.

Wait...shut the front door...did I just say sewed?!  Yep!  I did!!  Erin came over a few weeks ago and taught me how to sew.

Slight problem though...I'm impatient.  Which doesn't bode well with sewing.  I didn't want this to be a permanent pillow...I wanted to be able to remove the cover and wash it when necessary.  Because I'm impatient, I didn't really think about how to implement that until I got three out of the four sides done.  Then I decided I'd just flap over the pillow for now, tuck it in, and maybe add a zipper later.  So this is where my elephant pillow's top currently stands :


I decided I'd get smarter with my next two pillows I wanted to make.  I had two napkins for the front that I loved the pattern of, and my dark pink fabric accented the back perfectly.

I cut laid out my napkin, and used it to cut out the shape/size of my fabric, leaving excess around the sides to account for seams.


Here's where I thought I got really smart.  To solve my wanting to be able to wash the pillow case dilema, I decided I'd make an envelope style pillow.  So, I cut my back fabric into one third and two third segments...


Used these cool clips to hold my hem line in place


Got excited that my hem turned out semi decent looking...


Sewed the right sides (the sides you want everyone to see) together, and wala!


This is my pillow inside out.  It's not perfect, but you won't see the hem/seam lines because I sewed it inside out.  I was so pleased with myself at this point.  I flipped my pillow cover right side out, and shoved my pillow in...


Woot!!  Minus needing ironing, look how pretty that pillow is!!!

Untill ...

you flip her over...


And then she looks like me when I try to get away with not wearing maternity jeans.  The pillow is too fat!  Sigh.  Realistically I didn't care enough to scrap it.  It's the back of the pillow for crying out loud...and I did it all.by.myself.  I know, it looks like my 5 year old self did it, but that's besides the point.

I really wanted to make two of these, so I decided to cut MORE fabric for the second one for the back.  But I'm impatient, remember?  So instead of recognizing that I was too tired to do this right, I attempted to make my second pillow...

I messed up.  I sewed the right sides together for half of the pillow, and the wrong and right side together for the second half of the pillow.  I know there's tutorials on how to measure for this, but I just decided I needed about an extra 6 inches and went for it.  This is the sad, sad shape of the back of my 2nd pillow.


But again, it's the back, so I don't really care.

I did want to make two MORE pillows though.  I started a different night before bed and decided that since I was tired, I'd resort to my old trust fabri-tac ways.

I cut out my fabric to 20'' (my two insert pillows are 18'', so that allowed for a 'seam'.)


Then cut my line for my envelope...


Then added a bead of fabric tac around the outside of the full pillow and pressed together the fabric.  I let it sit overnight to dry (for two pillows), and had this in the morning for the backside :


I was so excited and anxious to get my pillow inside of here...it really looked half way decent!!  So I shoved it in there, and ...


BOOO!!!  Apparently the magic of fabri-tac is lost on some fabrics.  SO SAD!

Last night I took both of these half put together pillows and sewed them up instead.  They're not perfect either, but hey...I'm just a beginner!  Lesson learned though : sometimes sewing IS easier than fabri-tac.

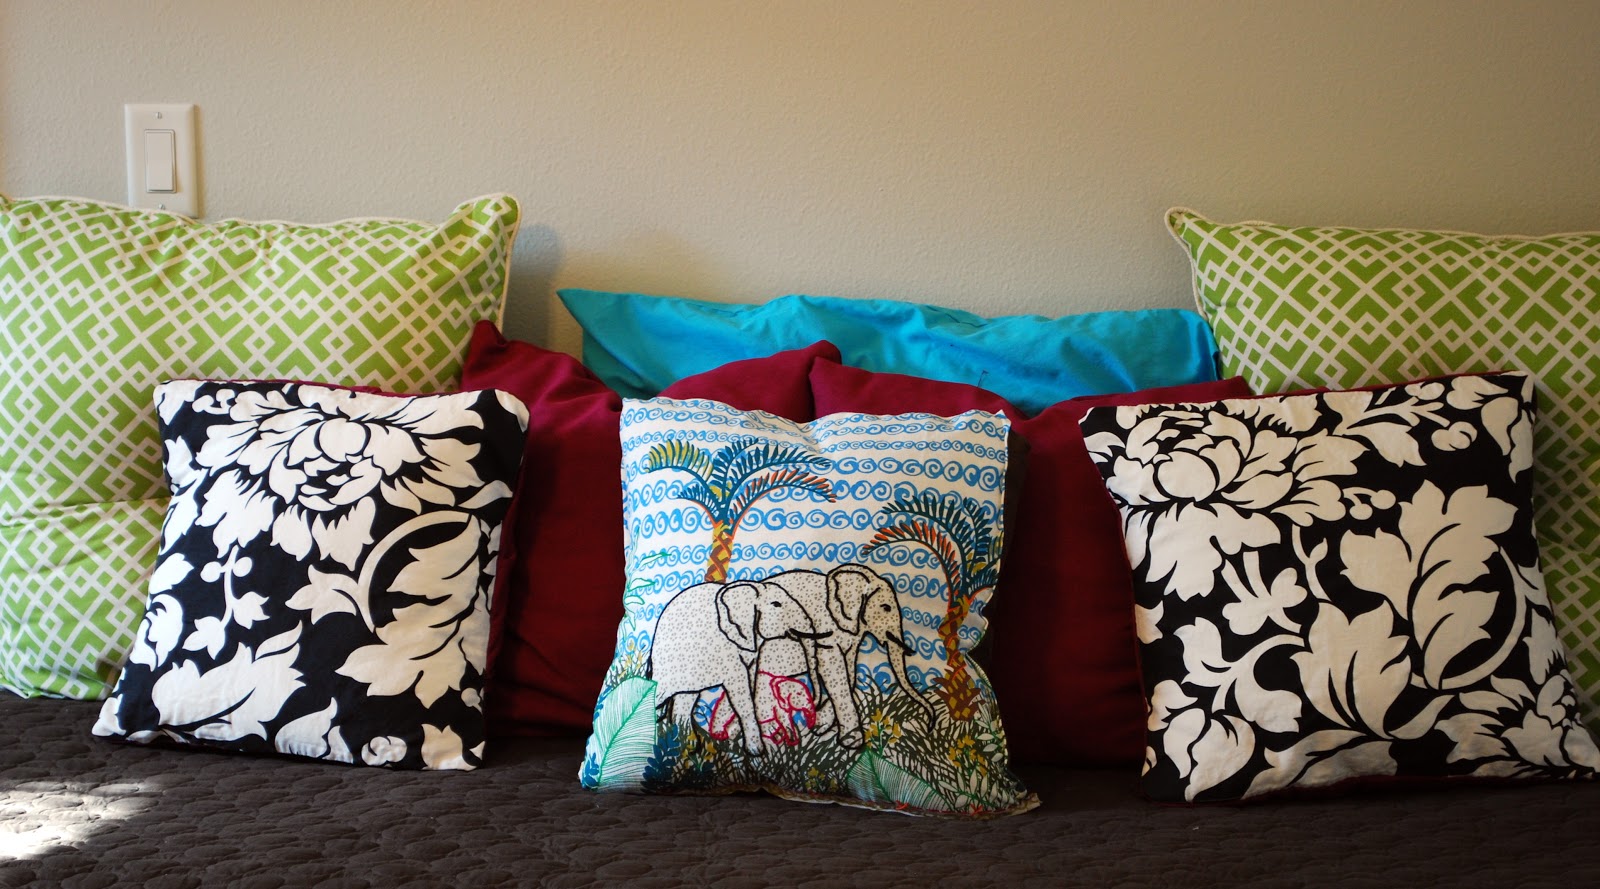
Here's the end result of all 5 of my pillow adventures :


They might be a little rough around the edges, but they're good enough for me!

Yes, I know...worlds longest post on pillows!  I really do love using napkins and tea towels though as my face for pillows.  I can get so much more bang for my buck that way.

Hope everyone's had a great week so far.  I don't know that I'll have time to post again this week, I have my sister in town until Friday morning.  So...I hope everyone has a great weekend too!

If you enjoyed this post, please leave a comment or subscribe to the feed reader to get future posts delivered to your reader.


I'm linking up to the parties in my sidebar...go see what everyone else is 'talking' about!

Friday, March 4, 2011

Nursery Room - Closet Reveal

It's Friday!!!  You know what that means, right?!  Well, minus the fact that tomorrow is Saturday...and it's officially the start of the weekend...oh, and it's officially my last day of being a 28 year old (yep-my bday is tomorrow!  woot!), it's CLOSET REVEAL DAY!!!!  Yay!!!

All right, so maybe the weekend is more exciting to you guys than anything else...that's besides the point!  Just humor me and pretend you're ecstatic to see the whole closet in all of it's glory, m'kay?!  Thanks!

A few weekends ago, while I was working on the finishing coats of the bookshelves, Chris primed and painted all of the 'pieces' of the closet.  Our neighbors officially think we're nuts.  Bookshelves, closet, toybox, and actually another something else that we've been up to...they think we're running a furniture biz from the inside of our home.


This is really the only 'in progress' shot I've got.  The rest was pretty explanatory...we followed our drawing for the design pattern of it, nailed and glued it all together, re-sanded after we caulked in the seams and filled in the nail homes, and gave it another fresh coat of white paint.

Oh wait...one more.


Chris notched out the side pieces of the closet to account for the quarter round molding and the baseboard.  Our closet system sits flush against the back of the closet wall now.


To install the closet system, we bought little L-brackets and screwed them into drywall screws to attach to the back of the closet, and then attached them to our actual closet pieces.  We had wanted to screw them into the studs, but the studs, of course, were not anywhere close to where we needed them to be.


We did this on the bottom shoe shelves, in the middle, and then again along the top.  We tried to 'hide' them so they weren't too obvious.  We did do a little bit of damage to the walls as we were installing the closet system, but nothing a little touch up work won't fix!

After we got her shoeshelves and the top shelf in, we added in the clothing rails (is that even what they're called?!  I have no idea...the things that you hang the clothes on...), and then added in a few of the baskets that I no longer needed from us doing our own closet update  with the shoe shelves last year.  Score for free reuse that fits in perfectly!

Without further ado, I give you...the closet!


The top cubby is bigger than the rest of the cubbies.  This will allow her to put boots or things that are a little bit taller up there.  The right side is for hanging up longer items.  The mirror can be removed if it becomes unnecessary one day.  We designed the whole closet system to be adjustable (minus the cubbies), so that it could grow with her.


This next one cracks me up.  Kodi wants to know why I forgot to include his bed at the bottom of the left side of the closet (per the closet design).  Poor Kodi...we'll have to make him another bed and put it under the window or something!


If you do go and look at the nursery room closet design, you'll notice that the toy box location is flipped.  That's because our closet isn't symmetrical, and the walls aren't even.  The toybox lid would have had to be shaved to go in on the left side, so we just flipped it to the right.  So not worth it once it was all put together!

Here's one with the bookshelves and the new closet.  I'm loving how fresh and fun everything feels in here so far!


Onto my favorite part...the before and after!  It's hard to remember that we started with this at the end of January :


and we now have this :


What a difference, huh?!

Hope everyone has a great weekend!  We're taking tomorrow off from nursery design and having a bday BBQ at the house...I'm so excited for what my last year in my 20's is going to bring!!  Don't worry, I'll eat an extra piece of cake for all of you guys too.  I am pregnant after-all!
If you enjoyed this post, please leave a comment or subscribe to the feed reader to get future posts delivered to your reader.


I'm linking up to the parties on my sidebar...go check out everyone else's reveals!
Related Posts with Thumbnails