Pages

Tuesday, August 31, 2010

Double Vision : Making A{nother} Daybed

I made my first daybed back in May, and immediately decided I wanted to build another one for the same room.  Ana White of Knock Off Wood is so amazing for providing free plans to make this possible.  If you haven't checked out her plans yet, please do so!  I wanted the beds to match up like this picture and put a table in between them.

Image courtesy of Pottery Barn
When my sister and I planned a date for her family to come over, I immediately went out and got the wood to build another daybed so that both of my nieces could have a place to sleep.


I have had this picture in my sneak peak section for forever...close to three months...entirely too long!  In my first daybed post, I wrote that next time I'd paint before building.  So that's exactly what I did.  I sanded, primed, sanded, painted, sanded, painted, and then built.

The problem with this approach for me is that I'm not a professional builder, and my pieces don't go together perfectly.  So, I sanded and sanded and sanded once I got the boxes together, which meant inevitably, I removed a lot of my paint and had to repaint the entire thing a million times (paint, sand, paint, sand, etc.)

I did manage to get the bed put together before my nieces came over, but I hadn't re-painted any of it yet and you could definitely tell it needed quite a few more coats.  I thought I took pictures of this, but I can't find them, so you only get the finishing pictures.  I did exactly the same as the daybed back in May, so if you'd like more step by step pictures, or the finishing details, go here to see them.

Ready to see the finished product?!

Here she is!


Of course I have to add a few details shots too.  I sanded down the edges again so I could emphasize the clean lines look, stained them, and repainted around the faces to keep it bright and white.


Here's a picture of both daybeds in the room next to each other.  Yes, the pillows have changed.  I'm still working on getting everything there...I stole the yellow and white pillows from my living room.


You'll never be able to see these sides most of the time...I plan on putting a table here, but I still wanted to show that I at least finished them.

I've made so much progress in this room, but it still has a ways to go.  It's not perfect, but it's miles upon miles better (and at a reasonable cost!) than what I started out with...which was this:


I've painted the floors, painted the trim, painted the doors and door knob, built a daybed, revamped an old sewing machine cabinet, and now finished building another daybed.

Let's end on one last cheery picture...

Ahhh...SO much better!  Do you agree?!

f you enjoyed this post, please leave a comment or subscribe to the feed reader to get future posts delivered to your reader.


I'm linking up to the fun parties in my sidebar...go check out what everyone else is creating!


Friday, August 27, 2010

No Project Reveal

This week I did something I never do...I acted like a 28 year old without any kids and had an old friend over for dinner and wine....on a Tuesday.  If I hadn't had her over, I'd have my big project that I've been working on for the past 10 years a long time now finished and ready to show you.  I don't love it yet, but it's not in the dumpster either.  That's progress from Monday.

Chris started school this week and I already miss him.  Sigh...one more semester...we can do it!!

I've received quite a few sweet emails and notes from you guys this week.  Chris has also been pretty sweet this week.  Does everyone around me think I'm on the brink of a nervous break down or something?  Work, fundraising, training, and building / crafting have all kept me quite busy and semi drained over the past few weeks, so maybe it's starting to show.  I really appreciate the compliments and sweet comments you guys leave...it really makes my day!

I hope everyone has a great weekend.  Look for my big project blog next week!

Wednesday, August 25, 2010

Insert Sewing Machine

When I re-did my sewing machine cabinet, I received a few funny comments asking where my sewing machine was. I don't have the first inkling on how to sew anything, let alone actually USE a sewing machine, but I am excited to start learning.

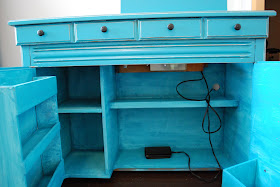
First, I had to modernize / Kara-ize (yep, I'm a verb) the cabinet so that it was more my style. The next step was to actually see if I could mount the sewing machine. My T. Mom had had this cabinet and the sewing machine sitting around for quite awhile, and my Dad never got around to seeing if it would mount inside. I believe the cabinet was initially a Habitat Restore purchase.

Erin was over one day and we took a look to see if it'd be possible to actually get the sewing machine IN the sewing machine cabinet. The screw that attached to the bottom of the cabinet was SO much smaller than the screw that was already in the cabinet. Easy solution, right? Just take the screw that held the bottom piece of the sewing machine together to Big Blue or Big Orange and get the same sized screw only smaller.

Well, easy for most people. In between actually making it to the store, I had a few Kara moments and lost the screw. Boo me. Erin told me to take in the bigger screw and just go for something smaller. She's so smart!

So this past weekend, that's exactly what we did. We came home with three different sets of screws, and guess what?


Do you see what I see?!


Hello upside down sewing machine!


Ah, there you are!!!  And here's a picture of the magic that makes this possible:


It's okay, I already know I'm a dork, you don't have to tell me.  The little things excite me. I am now officially ready for my lessons E!

Happy Wednesday!

Tuesday, August 24, 2010

Closet Part 2 : Door Makeover

Back in April, before most of you knew I existed, I did a quick transformation of our closet doors from this:

to this:

Please ignore my dirty laundry in the background...oops!

The silver was a nice little quicky upgrade, but I didn't do it right, and the silver scratched off easily.  This is what led me to research everything to re-do the door hardware once I found the actual color I wanted (it's even a comment of mine to my good friend Erin at the bottom of this post back in April...so many ideas swirling around constantly in this head of mine!).

So now that we've learned, and been successful at, re-doing hardware, it was time to upgrade this mirror, again, as part of our 8 million part closet renovation.  Besides, they were already off from adding in the shoe shelves, so now was as good a time as any to get it done right.

Step 1:  Get a hot guy to Lightly sand and then spray on primer.


 Step 2: Sit and read instructions on desired color spray paint bottle to make sure that your impatient wife is correct in saying that as soon as the primer dries (~10 minutes), it's okay to spray on the color.


Step 3:  Spray on the actual color.


Step 4: Spray on clear top coat / protector.

Step 5: Scrape off tons and tons of paint on the mirror with a sharp razor (not fun...perhaps taping should be step 1 the next go round).

Step 6: Hang Doors!


And one from the other angle so you can see how much better this goes with our existing vanity area and mirror:


And a rundown of the deets for those of you who are interested:
Primer:  RUST-OLEUM's Clean Metal
Spray Paint: RUST-OLEUM's Metallic all-surface paint in oil rubbed bronze
Top Coat:  RUST-OLEUM's Crystal Clear Enamel
Hunky Husband:  Not available for purchase.  Sorry ladies.

This time around took a lot longer than the last go round, but they don't scratch and look SO much better.  Ahh...the simple things in life.  Now onto part 3...sigh.

I'm linking up to the linky parties on my links tab...go check out what everyone else is creating!

Monday, August 23, 2010

I'm here, I'm here

We had another busy and project packed weekend, although we did manage to fit in an 8 mile run and some beach volleyball on Saturday.  We being a loosely used term...Chris ran less, but played more volleyball than I did, so it all works out in the end.

We had a lot of things to wrap up around here project wise before Chris starts back to school today.  We're generally the type that finishes one project before moving to the next, but we haven't been as good about that lately.  Too much to do, not enough time!

This weekend we finally finished installing the door hardware on all of the doors.  Actually, even that's not 100%, but it's close enough for me to cross it off my list.  Chris is waiting for me to finish up my big project before installing the door knob in the junk / craft / someday kids room.  He apparently doesn't trust me to not get paint all over the newly finished door handle.  I can't wait for the newness to rub off!

There are a few more small projects that I'll be posting on this week, and hopefully by Friday I'll have my big project done...that's if it doesn't go into the dumpster before then because I'm so fed up with it!!  Sigh...patience!

I saw this post over at Jennifer Juniper's Hope Studios blog on how to clean your makeup brushes, and put it on my to-do list for this weekend.  As awful as this is to admit, I don't think I've ever cleaned out my makeup brushes.  Disgusting, right?  It was so simple, and I feel so much better about putting makeup on now.  My bowls when I was done, were gross.  Too gross to share, just take my word for it!

Sorry no pictures for today's post...but stay tuned this week for more.  Hope everyone had a great weekend!

Wednesday, August 18, 2010

Closet Part 1 : Shoe Shelves

As I mentioned before, we're on an organizing kick. This past weekend we tackled part 1of a million many projects that we'll take on to get our closet up to par.

We ladies love our shoes, and although I was a late bloomer at developing that love, it has become a mild obsession.  We have these dividers that separate Chris's side of the closet and my side of the closet, which the previous owners used to store their shoes.


Initially, I put some of my shoes on these shelves, and some of them on the floor.  After that became somewhat of a nightmare with shoes on the floor, I tried to stack them on top of each other without much luck.  Everytime I'd take a pair out, I'd have to pick up at least 1 pair off the floor.

So a few months back I came up with the idea of putting baskets in these cubbies and putting our shoes in the baskets.


The idea was supposed to be that the blue baskets were Chris's and the pink baskets were mine.  The idea was that I'd share.  Bad idea...I took over with the exception of one lonely basket that Chris got.  The only basket of these that actually worked well was my flip flop basket on the bottom right.  I can see all of my various flip flops and just take out the pair I want.


For the rest of my shoes though, inevitably the pair that I want is at the bottom, so all of the shoes that are in the basket wind up all over the floor.  I'm one of those panic great ready people too...my bedroom and closet area slightly look like a war zone when I'm done.  I can be holding what I want in my hand and not be able to find it.  Point being, the basket method isn't a good one for me!

The main problem with the cubbies are that they're SO high.  My shoes get lost in there, and the top 75% is just a waste of space if I set my shoes out individually.

So what's a girl to do?  Add in extra shoe shelves with the help of her handy studly hubby, of course!

We had an assembly line going of mitering 1x2's (the braces for the shelves to go on), and sanding.  After we finished up with 18 of those, we got out the circular saw and continued our assembly line of cutting and sanding.


This was the basic idea of what we were going for.  1x2's for braces, and a shelf lying across them.

We measured half way up, got out our handy pocket level, and I held the 1x2's tight while Chris screwed them in.


Then we slid in the shelves, and wala!  We have ENOUGH shelves for my shoes!


The idea is to paint all of this.  You can see from the image above that we removed the closet doors for this project, so it's not a big deal that it's not painted yet.  We've got 8 trillion quite a few steps left to work on for this closet project, so we're waiting to paint until we're close to done.  It'll save us the headache of moving clothes in and out of the closet multiple times!


Do you see my empty shelf?!?!  I told Chris that means I get to go get TWO new pairs of shoes!!!  He put two pairs of his shoes in that shelf and then a few pairs on top of his jeans instead.  Sigh...I guess I have to share!


Shoes glorious shoes!!!!  I actually can't wait to paint this section.  I want to do a fun blue like my mail holder.  I know it generally stays behind closed doors, but the completion of this project makes me so happy.  It's hard to explain!

Oh, and the best part about this project?  It cost us absolutely nothing to create.  We already had everything!

f you enjoyed this post, please leave a comment or subscribe to the feed reader to get future posts delivered to your reader.
I'm linking up the parties on my links tab...go check out what everyone else is creating!

Tuesday, August 17, 2010

My Favorite Things

Trendy Treehouse's Shutter Love Tuesday's theme this week is Favorite Things, so I thought I'd do a separate post to participate, because I have oogles of pictures for this very topic.

While I do enjoy a good book, a cup of coffee, a good game of volleyball, awesome friends and family, Gator Football, and any hike or nature trail, my favorite things are most definitely Chris and Kodi (sorry awesome friends and family, you came in a close second!).


Oh, how both of my boys love the water!!  We've actually trained Kodi to sit on our laps so that he doesn't just swim and swim and swim out in the river or ocean.  (Great, now I've got "Just Keep Swimming" from Finding Nemo in my head!)


I love that Kodi actually smiles when he's happy.  That's a for real, genuine, thanks guys I love you so much, lets go swimming AGAIN, kind of Kodi smile.


Here's my ham of a dog smiling it up for the camera again.  My MIL likes to get Kodi the most annoying toys that make lots of noise, and he absolutely loves them.  This is a little squirrel thing that gets so slobbery and disgusting, but makes the Kodi-man happy, so we let him play with it.  How can you say no to that face?!


I took this picture on our way to the Farmer's Market.  It's so telling of how they both are.  Chris has got a short leash to keep Kodi close, but it's not tight because Kodi loves being right next to him.  Kodi is a little ADD though, and keeps constant surveillance of his surroundings.


I love this grin, even when it's from him being SO filthy dirty after running or rolling in something.  It had rained a lot this day, and Kodi took full advantage of the mud puddles.  He's exhausted and so happy in this picture...the best!


My husband is hot.  He's my absolute favorite!!


Kodi goes outside quite a bit to sunbathe and just 'be' with nature.  We've got a bench out by this patch of grass that he loves to lay in...it's nice to just go out there and sit and relax.  Believe it or not, I do it...on occasion!!


And finally...my two studs on the water.  When they're happy, I'm happy.  They make my heart smile!!

I know, I know, I'm so very lucky and so very blessed.  That's enough of me being mushy though, I'd love to hear what your favorite things are...please share!

Monday, August 16, 2010

Remembering Stretch The Bird

Stretch was my D. Mom's cockatiel that she had for 15 + years.  She passed away a few weeks ago, and my Mom was pretty upset by it.  Stretch had been given to her by my Uncle when she (Stretch) was 5-6 years old because she didn't do well with the other large birds that he had.

My Uncle lives in Alabama, and we used to head up there every July to visit him and my Grandparents.  I remember the car ride back home that year, just barely a teenager, excited at what new tricks we could teach our new pet.  She took some coming around, but she learned to perch on our fingers and she'd talk to us too.  She was a really special bird, and has been through quite a lot with my Mom.

So when my Step Dad called and asked me to make a cross for her, I, of course, said yes.  My Step Dad is handy, but he has a tendency to put of things until 'tomorrow', and he knew that I'd make a prettier cross than two pieces of wood stuck together, so he phoned in a favor (I also still owe him from painting our doors!).

I've never really free handed anything, so I was pretty nervous about getting this right.  My Step Dad asked for me to do this on 1x2's, but I couldn't get a bird to come out looking like anything other than a blob on that small of a surface.  He asked me to put Stretch's name, some hearts or something, and a bird on the cross...or something like that.

I started by drawing out my shapes with a pencil, and then filled in my pencil lines with my paintbrush dipped in stain.

The Hearts

Stretch was yellow and green, so this bird looks nothing like Stretch did, but it's supposed to symbolize Stretch, not BE stretch, so overall I was okay with it.  It took me forever to come up with a color / scheme that I was happy with...I kept putting stain on, then wiping it off and starting over again.  Hopefully my Mom likes it!
Bird on Perch
Here's what that entire piece looked like together:


For the piece going longways, I took stain and wrote in Stretch's name.  I waited for that to dry, then put a few coats of polyurethane on it to give it protection from the weather.  Then I used exterior screws (so they wouldn't rust), and screwed the two pieces together from the back.  I wasn't sure if I wrote Stretch's name too big, which is the reason I stuck with screws.  My Mom and/or Step-Dad can re-do whatever part of this isn't to their liking easily.  I get really nervous giving stuff I've made away to other people, even if it's my family.  I know what I like, but we all have different tastes!


I think their plan is to put this out by the back of the fence where their bird feeder is, and where Stretch is laid to rest.


You were a good birdie Stretch, and you will be missed!

Hope everyone had a great weekend!  I ran 10 miles for my training run on Saturday, so that day was pretty much shot energy wise, but we were really busy and productive, and crafty on Sunday!  Stay tuned the rest of this week to see what we were up to.


I'm linking up to the parties on my sidebar...go check them out!